![[Title] Axie Ruin 1-5 Strategy](https://blockchain-game.jp/wp-content/uploads/2022/01/【初心者必見!】アドベンチャーRuin1〜5攻略の手引きEnglish1.jpg)
[box02 title=”What you can learn from this article”]・ Axie Infinity’s ADVENTURE Ruin 1-5 strategy information
・ Tips for defeating the enemy[/box02]
[chat face=”TJ_normal.png” name=”TJ” align=”left” border=”gray” bg=”none” style=”maru”]The first ADVENTURE you play right after starting Axie Infinity, you’ll be nervous if you can win![/chat]
In this article, I will explain the strategy and information of Ruin 1 to 5.
In addition, we will give you tips on how to beat the enemy in ADVENTURE in general, which you can use when you get stuck.
ADVENTURE Rules
Before we start telling you strategy, I will explain the rules of ADVENURE.
[chat face=”TJ_normal.png” name=”TJ” align=”left” border=”gray” bg=”none” style=”maru”]At first, there are too many points and you may not understand them well.
But you will experience it in actually play.[/chat]
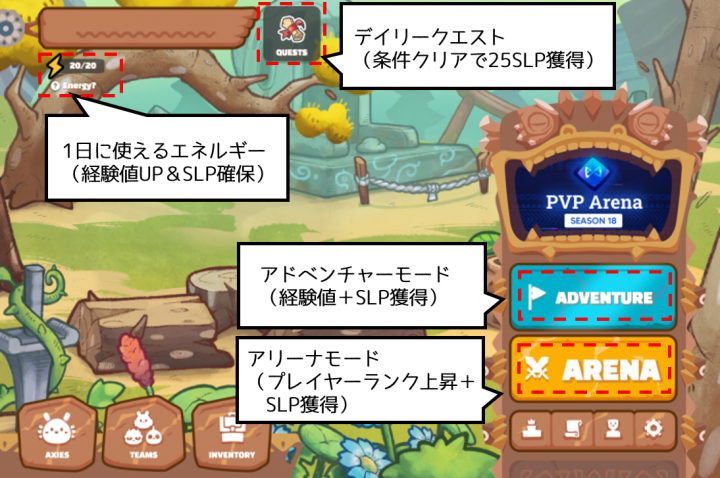
There are two modes to play Axie Infinity.
- ADVENTURE: Battle with computers (get experience points, SLP acquisition)
- ARENA: PVP (Personal) match (rank up, SLP acquisition)
[chat face=”TJ_normal.png” name=”TJ” align=”left” border=”gray” bg=”none” style=”maru”]Unlike ARENA, ADVENTURE has a rule that the ability value raise as the level of Axie ups.[/chat]
There are other rules as follows.
ADVENTURE rules
- The enemy has no attributes
- If you win the battle with 20 Energy remaining in the initial state, you will consume 1 Energy and receive experience points.
- If there is an Axie 5 levels higher than the challenging Ruin, the enemy will become stronger.
- As the enemy becomes stronger, the acquired experience value also changes.
- The maximum SLP that can be obtained by clearing ADVENTURE is 50 SLP per day.
Explanation of Battle Rules
Next, I will explain the battle rules.
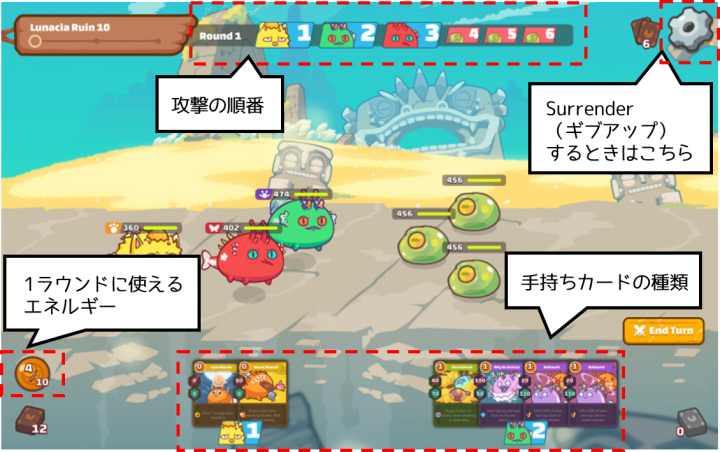
The order of actions is displayed at the top of the screen.
[chat face=”TJ_normal.png” name=”TJ” align=”left” border=”gray” bg=”none” style=”maru”]You have to check the order of actions and decide which card you use.[/chat]
The order of actions is basically determined by the SPEED value of Axie.
If the SPEED value is the same, it is determined in the order of lower HP → higher skill value → higher morale → lower Axie individual ID (# ~).
The amount of energy that can be used in this round is displayed in the lower left.
[chat face=”TJ_normal.png” name=”TJ” align=”left” border=”gray” bg=”none” style=”maru”]To use the card, you need the energy displayed in the upper left.[/chat]
The cards you draw randomly decided from 24 cards (Axie’s 4 parts x 2 pairs of cards x 3 Axies).
Initially, 6 cards are distributed, and then 3 cards are added every round (after all the actions are completed) .
ADVENTURE combat rules
- The enemy party has no attributes
- Initial Energy is 4, recovers 3 per round (everyone’s action ends)
- Energy can be carried over to the next Wave (Round 2/3)
- The initial hand is 6 cards, and 3 cards are added in each round.
- Hands cannot be carried over to Round 2/3
- The opponent does not enter the last stand
[Preservation required] Tips for Capturing ADVENTURE
Next, I will tell you the tips of the strategy.
Make a note of it somewhere or save it as a screenshot.
Strategy tips
- Axie placement should be either at the top or at the bottom.
- Tap the enemy to figure out which Ability Card they are using.
- Be aware of the order of actions and the target of attack.
- Even if the combination of drawn cards is bad, you should defeat them before they act.
- Use two or more cards in combination as much as possible (damage up by combo).
- On the first turn, the enemy tries to use all the cards, so the attack is intense.
- Normally, not all Axies remain.
- Axie in the last stand will be useful as a wall.
In fact, with Ruin 1-5 introduced in this article, you can win without being aware of the tips.
However, as you progress through Ruin, the difficulty level will increase and your step would be stop.
[chat face=”TJ_normal.png” name=”TJ” align=”left” border=”gray” bg=”none” style=”maru”]At such times, please return to this basic.
I’m sure it will be useful![/chat]
If you don’t understand the rules of ADVENTURE, please see this article.

Ruin 1 (aim level 1)

[chat face=”TJ_normal.png” name=”TJ” align=”left” border=”gray” bg=”none” style=”maru”]It may be exciting, but this Ruin can win even if you choose card randomly.[/chat]
This Ruin is a good place to understand the game rules of Axie Inifinity, so let’s practice how to use the cards.
Enemy information
| Enemy 1: Toady |
 |
| Card 1 effect |
| Apply Speed- Debuff to target for 2 rounds (Speed- = 20% Speed decrease in the next round) |
| Card 2 effect |
| nothing special |
| Card 3 effect |
| Apply a stun debuff to the target with a 30% chance (* Stun = Axie with this debuff will always fail the next attack. Disappear when attack or attacked and damage will break through the shield. ) |
Experience earned / SLP
| Ruin | Aim level | Experience points | SLP |
| 1 | 1 | 63 | 1SLP * Up to 1 time |
Ruin 2 (aim level 2)

In Ruin2, there is a slightly stronger enemy in rear line.
Also, the enemy have 4 cards, which is more like an interpersonal battle.
[chat face=”TJ_normal.png” name=”TJ” align=”left” border=”gray” bg=”none” style=”maru”]This enemy will make full use of recovery, but it will not be so difficult to defeat.[/chat]
Enemies in the front line have the same cards as Ruin1.
Enemy information
| Enemy 1: Toady |
 |
| Card 1 effect |
| Apply Speed- Debuff to target for 2 rounds (Speed- = 20% Speed decrease in the next round) |
| Card 2 effect |
| nothing special |
| Card 3 effect |
| Apply a stun debuff to the target with a 30% chance (* Stun = Axie with this debuff will always fail the next attack. Disappear when attack or attacked and damage will break through the shield. ) |
| Enemy 2: Planter |
 |
| Card 1 effect |
| Apply Speed- Debuff to target for 2 rounds (Speed- = 20% Speed decrease in the next round) |
| Card 2 effect |
| Heal 25% of user’s maximum HP |
| Card 3 effect |
| nothing special |
| Card 4 effect |
| Apply a stun debuff to the target with a 30% chance. (* Stun = Axie with this debuff will always fail the next attack. Disappear when attack or attacked and damage will break through the shield. ) |
Experience earned / SLP
| Ruin | Aim level | Experience points | SLP |
| 2 | 2 | 76 | 1SLP * Up to 1 time |
Ruin 3 (aim level 2)


One thing to note about Ruin3 is that you have up to 2 Waves (6 enemies in total).
[chat face=”TJ_confuse.png” name=”TJ” align=”left” border=”gray” bg=”none” style=”maru”]I was one of the people who was deceived.
I ran out of energy in Wave1 and was afraid on the first turn of Wave2.[/chat]
There will be enemies behind Wave2 that are a little stronger than the other enemies, but let’s calm down and deal with them.
Enemy information
| Enemy 1: Toady |
 |
| Card 1 effect |
| Apply Speed- Debuff to target for 2 rounds (Speed- = 20% Speed decrease in the next round) |
| Card 2 effect |
| nothing special |
| Card 3 effect |
| Apply a stun debuff to the target with a 30% chance (* Stun = Axie with this debuff will always fail the next attack. Disappear when attack or attacked and damage will break through the shield. ) |
| Enemy 2: Big Fang |
 |
| Card 1 effect |
| nothing special |
| Card 2 effect |
| Heal user by 50% of the damage to the target |
Experience earned / SLP
| Ruin | Aim level | Experience point | SLP |
| 3 | 2 | 143 | 1SLP * Up to 1 time |
Ruin 4 (aim level 3)


In Ruin4, Red Jam will appear as a new enemy.
[chat face=”TJ_confuse.png” name=”TJ” align=”left” border=”gray” bg=”none” style=”maru”]This enemy is annoying and causes great damage, isn’t it?[/chat]
This Ruin also has two Waves, so be careful not to rush too much in Wave1.
Enemy information
| Enemy 1: Toady |
 |
| Card 1 effect |
| Apply Attack- Debuff to target for 2 rounds (Attack- = 20% Attack decrease in the next round) |
| Card 2 effect |
| nothing special |
| Card 3 effect |
| Apply a stun debuff to the target with a 30% chance (* Stun = Axie with this debuff will always fail the next attack. Disappear when attack or attacked and damage will break through the shield. ) |
| Enemy 2: Red Jam |
 |
| Card 1 effect |
| nothing special |
| Card 2 effect |
| The user takes 20% of his maximum HP when used |
| Enemy 3: Big Fang |
 |
| Card 1 effect |
| Apply a stun debuff to the target with a 30% chance (* Stun = Axie with this debuff will always fail the next attack. Disappear when attack or attacked and damage will break through the shield. ) |
| Card 2 effect |
| Heal user by 50% of the damage to the target |
Experience earned / SLP
| Ruin | Aim level | Experience point | LP |
| 4 | 3 | 151 | 1SLP * Up to 1 time |
Ruin5 (aim level 3)


In the last, I’ll tell you information about Ruin 5.
[chat face=”TJ_normal.png” name=”TJ” align=”left” border=”gray” bg=”none” style=”maru”]If you can clear previous stage easier, you will be able to win with a margin.[/chat]
Since the attacks of the enemies in the first round are often intense, be careful of repeated hits of Red Jam and Planter, which have high attack power.
You can fight easily if you put Axie with a card with high defense power.
(However, if you have already bought the Axie, you cannot easily replace the Axie …)
Highly defensive card example:
HELMET(Shelter)

TIMBER(Woodman Power)

PUMPKIN(October Treat)

RED EAR(Slippy Shield)

Enemy information
| Enemy 1: Toady |
 |
| Card 1 effect |
| nothing special |
| Card 2 effect |
| Apply a stun debuff to the target with a 30% chance (* Stun = Axie with this debuff will always fail the next attack. Disappear when attack or attacked and damage will break through the shield. ) |
| Card 3 effect |
| Apply Speed- Debuff to target for 2 rounds (Speed- = 20% Speed decrease in the next round) |
| Enemy 2: Big Fang |
 |
| Card 1 effect |
| nothing special |
| Card 2 effect |
| Apply a stun debuff to the target with a 30% chance (* Stun = Axie with this debuff will always fail the next attack. Disappear when attack or attacked and damage will break through the shield. ) |
| Card 3 effect |
| Heal user by 50% of the damage to the target |
| Enemy 3: Red Jam |
 |
| Card 1 effect |
| Apply Speed- Debuff to target for 2 rounds (Speed- = 20% Speed decrease in the next round) |
| Card 2 effect |
| Apply Attack- Debuff to target for 2 rounds (Attack- = 20% Attack decrease in the next round) |
| Card 3 effect |
| nothing special |
| Card 4 effect |
| The user takes 20% of his maximum HP when used |
| Enemy 4: Planter |
 |
| Card 1 effect |
| Heal 25% of user’s maximum HP |
| Card 2 effect |
| Apply a stun debuff to the target with a 30% chance (* Stun = Axie with this debuff will always fail the next attack. Disappear when attack or attacked and damage will break through the shield. ) |
| Card 3 effect |
| nothing special |
Experience earned / SLP
| Ruin | Aim level | Experience point | SLP |
| 5 | 3 | 181 | 2SLP |
Summary
In this article, I introduced the strategy information of Ruin 1-5.
[chat face=”TJ_normal.png” name=”TJ” align=”left” border=”gray” bg=”none” style=”maru”]Ruin1 ~ 4 has little merit to play repeatedly, so avoid desperately continuing to clear it.[/chat]
* Suitable for practice and achieving the quota of Daily Quest
The SLP and experience points earned when clearing Ruin 1 to 5 are as follows.
| Ruin | Aim level | Experience point | SLP |
| 1 | 1 | 63 | 1SLP * Up to 1 time |
| 2 | 2 | 76 | |
| 3 | 2 | 143 | |
| 4 | 3 | 151 | |
| 5 | 3 | 181 | 2SLP |
・The maximum SLP that can be obtained by clearing ADVENTURE is 50 SLP per day.
・Ruin1 ~ 4 cannot get SLP even if cleared after the second time.
・Experience points are not available without consuming Energy (20 by default).
・The amount of experience you can earn depends on the level of your Axie.
[chat face=”TJ_normal.png” name=”TJ” align=”left” border=”gray” bg=”none” style=”maru”]I have created Ruin6 and later, so please continue to read it![/chat]