![[Title] Axie Ruin 6-10 Strategy](https://blockchain-game.jp/wp-content/uploads/2022/01/【タイトル】AxieRuin1-6攻略English1.jpg)
[box02 title=”What you can learn from this article
“]・ Axie Infinity’s ADVENTURE Ruin 6 ~ 10 information
・ Tips for defeating the enemy[/box02]
[chat face=”TJ_normal.png” name=”TJ” align=”left” border=”gray” bg=”none” style=”maru”]I think it’s time to get used to the game rules of Axie Infinity, but isn’t Ruin6 difficult?[/chat]
In fact, Ruin 6 and 7 are one of the barriers up to Ruin 10.
In this article, we will explain the strategy information of Ruin 6 to 10 as the second strategy of ADVENTURE.
・Enemy stats vary depending on the level of Axie.
・The enemy stats introduced in this article are for Axie level 25..
Ruin 6 (aim level 6)


The first is Ruin 6, which is said to be unexpectedly difficult.
[chat face=”TJ_confuse.png” name=”TJ” align=”left” border=”gray” bg=”none” style=”maru”]To tell the truth, I’m actually one of those who had a hard time clearing Ruin6.[/chat]
In Ruin6, there are up to Wave3, and a total of 9 enemies will appear.
The enemies of Wave 1 and 2 are relatively weak, but if you exhaust your HP here, it will be hard at the last Wave.
[chat face=”TJ_normal.png” name=”TJ” align=”left” border=”gray” bg=”none” style=”maru”]I don’t think I was concerned about the level of Axie until Ruin5, but for Ruin6, I recommend you to try after raising the level to some extent .[/chat]
On top of that, place an Axie with high defense and HP in the front line so that the Axie with high attack power can survive as much as possible.
It’s a little pity, but it’s part of the strategy to sacrifice Axie who has a high endurance.
[chat face=”TJ_confuse.png” name=”TJ” align=”left” border=”gray” bg=”none” style=”maru”]If you are unlucky in the first round of Wave3, the team will be destroyed by the continuous attack of Big Fang with high attack power in the back line of the opponent …[/chat]
Also, if you want to attack the Big Fang, the Planter in the front line has the ability to recover, which is troublesome.
Enemy information
| Enemy 1: Toady |
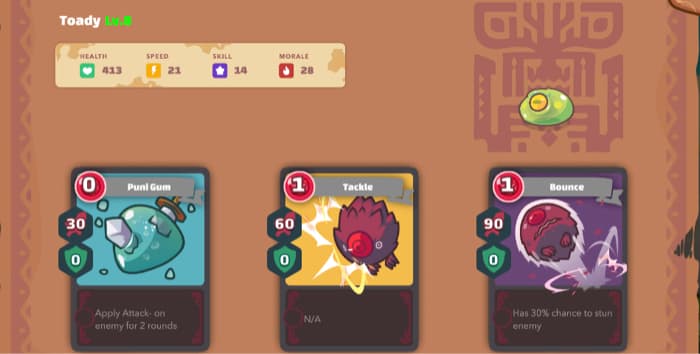 |
| Card 1 effect |
| Apply Speed- Debuff to target for 2 rounds (Speed- = 20% Speed decrease in the next round) |
| Card 2 effect |
| nothing special |
| Card 3 effect |
| Apply a stun debuff to the target with a 30% chance (* Stun = Axie with this debuff will always fail the next attack. Disappear when attack or attacked and damage will break through the shield. ) |
| Enemy 2: Red Jam |
 |
| Card 1 effect |
| nothing special |
| Card 2 effect |
| The user takes 20% of his maximum HP when used |
| Enemy 3: Planter |
 |
| Card 1 effect |
| Heal 25% of user’s maximum HP |
| Card 2 effect |
| Heal adjacent allies by 25% of it’s maximum HP |
| Card 3 effect |
| nothing special |
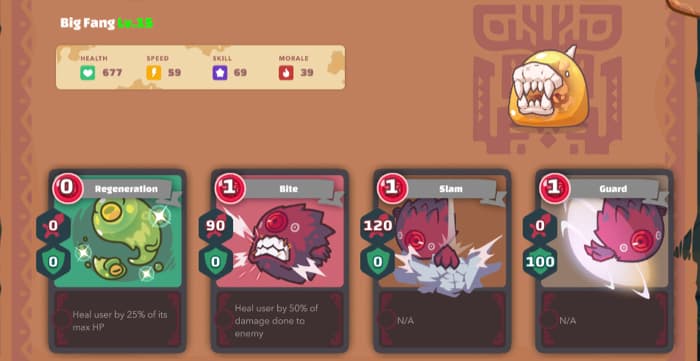
| Enemy 4: Big Fang |
 |
| Card 1 effect |
| nothing special |
| Card 2 effect |
| Apply a stun debuff to the target with a 30% chance (* Stun = Axie with this debuff will always fail the next attack. Disappear when attack or attacked and damage will break through the shield. ) |
| Card 3 effect |
| Heal user by 50% of the damage to the target |
Experience earned / SLP
| Ruin | Aim level | Experience point | SLP |
| 6 | 6 | 256 | 2SLP |
Ruin 7 (aim level 6)


In Wave 1 of Ruin7, Big Fang is in front.
If you can draw the card well, you can defeat it before attacked.
If it takes a long time to defeat the Big Fang, it will be a tough battle as the Big Fang and the Planter will use the recovery card.
[chat face=”TJ_normal.png” name=”TJ” align=”left” border=”gray” bg=”none” style=”maru”]If you could’t draw good cards, you can also surrender from the gear on the upper right.[/chat]
In Wave2, Red Jam uses a card that receives recoil instead of doing high damage, but the Planter recovers the recoil.
Planter is also troublesome because it has a high attack power.
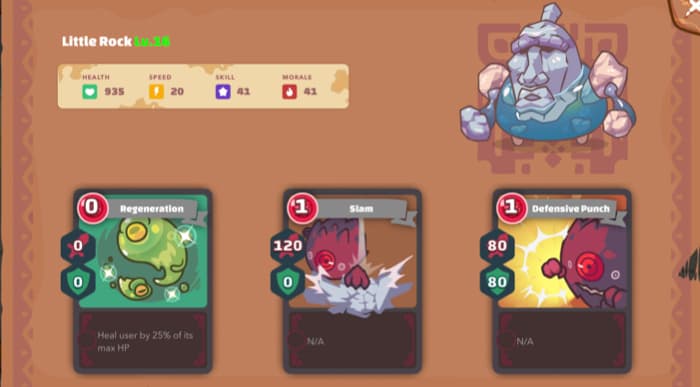
And in Wave 3, there are huge rock enemies (though the name is Little Rock …).
[chat face=”TJ_sad.png” name=”TJ” align=”left” border=”gray” bg=”none” style=”maru”]Little Rock is insanely strong, as it looks.
Moreover, it is very troublesome because the Planter will recover.[/chat]
If Little Rock survives for a long time, a powerful attack will destroy the team, so fight with all your might from the first round.
Therefore, the point of winning is to leave a lot of energy in Wave2 .
Wave3 enemies will use defensive cards, so be sure to use more cards to defeat them one by one.
Enemy information
| Enemy 1: Big Fang |
 |
| Card 1 effect |
| Heal 25% of user’s maximum HP |
| Card 2 effect |
| Apply a stun debuff to the target with a 30% chance (* Stun = Axie with this debuff will always fail the next attack. Disappear when attack or attacked and damage will break through the shield. ) |
| Card 3 effect |
| Heal user by 50% of the damage to the target |
| Enemy 2: Planter |
 |
| Card 1 effect |
| Heal adjacent allies by 25% of it’s maximum HP |
| Card 2 effect |
| nothing special |
| Card 3 effect |
| Apply a stun debuff to the target with a 30% chance (* Stun = Axie with this debuff will always fail the next attack. Disappear when attack or attacked and damage will break through the shield. ) |
| Enemy 3: Red Jam |
 |
| Card 1 effect |
| nothing special |
| Card 2 effect |
| The user takes 20% of his maximum HP when used |
| Enemy 4: Planter |
 |
| Card 1 effect |
| Heal 25% of user’s maximum HP |
| Card 2 effect |
| Heal adjacent allies by 25% of it’s maximum HP |
| Card 3 effect |
| nothing special |
| Enemy 5: Toady |
 |
| Card 1 effect |
| Apply Attack- Debuff to target for 2 rounds (Speed- = 20% Attack decrease in the next round) |
| Card 2 effect |
| Apply a stun debuff to the target with a 30% chance (* Stun = Axie with this debuff will always fail the next attack. Disappear when attack or attacked and damage will break through the shield. ) |
| Card 3 effect |
| Apply Speed- Debuff to target for 2 rounds (Speed- = 20% Speed decrease in the next round) |
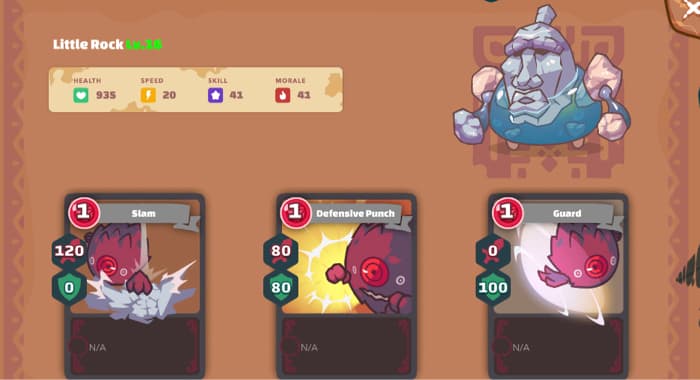
| Enemy 6: Little Rock |
 |
| Card 1 effect |
| Apply a stun debuff to the target with a 30% chance. (* Stun = Axie with this debuff will always fail the next attack. Disappear when attack or attacked and damage will break through the shield. ) |
| Card 2 effect |
| nothing special |
| Card 3 effect |
| nothing special |
Experience earned / SLP
| Ruin | Aim level | Experience point | SLP |
| 7 | 6 | 329 | 2SLP |
Ruin 8 (aim level 7)


Wave1 is troublesome with the card that Toady uses and attaches Speed- debuff when attacking.
This card has a defense of 50 (it goes up when used with other cards), so it is often not possible to defeat it with just the enemy’s health .
What I don’t like about Wave2 is Big Fang.
[chat face=”TJ_confuse.png” name=”TJ” align=”left” border=”gray” bg=”none” style=”maru”]What’s more, 2 BigFangs will come out even though I don’t like it one…
Fortunately, there are no cards with defensive power.[/chat]
In the final Wave 3, Little Rock with a sturdy face will come out again.
It’s hard to beat because he’s in the back and makes full use of recovery and shield.
Little Rock has a high attack power, so it is important not to act as much as possible.
Therefore, the key strategy is how quickly you can defeat Toady in the front and middle .
Enemy information
| Enemy 1: Toady |
 |
| Card 1 effect |
| Apply a stun debuff to the target with a 30% chance (* Stun = Axie with this debuff will always fail the next attack. Disappear when attack or attacked and damage will break through the shield. ) |
| Card 2 effect |
| nothing special |
| Card 3 effect |
| Apply Attack- Debuff to target for 2 rounds (Attack- = 20% Attack decrease in the next round) |
| Enemy 2: Red Jam |
 |
| Card 1 effect |
| nothing special |
| Card 2 effect |
| The user takes 20% of his maximum HP when used |
| Enemy 3: Toady |
 |
| Card 1 effect |
| Apply Attack- Debuff to target for 2 rounds (Attack- = 20% Attack decrease in the next round) |
| Card 2 effect |
| Apply a stun debuff to the target with a 30% chance (* Stun = Axie with this debuff will always fail the next attack. Disappear when attack or attacked and damage will break through the shield. ) |
| Card 3 effect |
| nothing special |
| Enemy 4:Big Fang |
 |
| Card 1 effect |
| Heal 25% of user’s maximum HP |
| Card 2 effect |
| Apply a stun debuff to the target with a 30% chance (* Stun = Axie with this debuff will always fail the next attack. Disappear when attack or attacked and damage will break through the shield. ) |
| Card 3 effect |
| Heal user by 50% of the damage to the target |
| Enemy 5: Toady |
 |
| Card 1 effect |
| Apply Attack- Debuff to target for 2 rounds (Attack- = 20% Attack decrease in the next round) |
| Card 2 effect |
| nothing special |
| Card 3 effect |
| Apply a stun debuff to the target with a 30% chance (* Stun = Axie with this debuff will always fail the next attack. Disappear when attack or attacked and damage will break through the shield. ) |
| Enemy 6: Little Rock |
 |
| Card 1 effect |
| Heal 25% of user’s maximum HP |
| Card 2 effect |
| nothing special |
| Card 3 effect |
| nothing special |
Experience earned / SLP
| Ruin | Aim level | Experience points | SLP |
| 8 | 7 | 305 | 2SLP |
Ruin 9 (aim level 8)


There are so many Big Fangs occur in Ruin9 (7 out of 9 are Big Fnag).
Especially Wave 3 is a shocking image that all enemies are Big Fang.
However, as you can see by actually playing with it, it is surprisingly easy to clear compared to Ruin 6 and 7.
[chat face=”TJ_normal.png” name=”TJ” align=”left” border=”gray” bg=”none” style=”maru”]However, be alert.
they will recover, so it’s quite a pain.[/chat]
It looks the same, but each opponent has different cards, so be sure to check when fighting.
And be aware that Wave3’s avant-garde is the only one that uses a card with 100 defenses .
Enemy information
| Enemy 1: Toady |
 |
| Card 1 effect |
| Apply Attack- Debuff to target for 2 rounds (Attack- = 20% Attack decrease in the next round) |
| Card 2 effect |
| nothing special |
| Card 3 effect |
| Apply a stun debuff to the target with a 30% chance (* Stun = Axie with this debuff will always fail the next attack. Disappear when attack or attacked and damage will break through the shield. ) |
| Enemy 2: Big Fang |
 |
| Card 1 effect |
| nothing special |
| Card 2 effect |
| Apply a stun debuff to the target with a 30% chance (* Stun = Axie with this debuff will always fail the next attack. Disappear when attack or attacked and damage will break through the shield. ) |
| Card 3 effect |
| Heal user by 50% of the damage to the target |
| Enemy 3: Red Jam |
 |
| Card 1 effect |
| Heal 25% of user’s maximum HP |
| Card 2 effect |
| nothing special |
| Card 3 effect |
| The user takes 20% of his maximum HP when used |
| Enemy 4: Big Fang |
 |
| Card 1 effect |
| Heal 25% of user’s maximum HP |
| Card 2 effect |
| Heal user by 50% of the damage to the target |
| Card 3 effect |
| nothing special |
| Enemy 5: Big Fang |
 |
| Card 1 effect |
| Heal 25% of user’s maximum HP |
| Card 2 effect |
| Apply a stun debuff to the target with a 30% chance. (* Stun = Axie with this debuff will always fail the next attack. Disappear when attack or attacked and damage will break through the shield. ) |
| Card 3 effect |
| Heal user by 50% of the damage to the target |
| Card 4 effect |
| nothing special |
| Enemy 6: Big Fang |
 |
| Card 1 effect |
| Heal 25% of user’s maximum HP |
| Card 2 effect |
| Apply a stun debuff to the target with a 30% chance (* Stun = Axie with this debuff will always fail the next attack. Disappear when attack or attacked and damage will break through the shield. ) |
| Card 3 effect |
| Heal user by 50% of the damage to the target |
| Card 4 effect |
| nothing special |
| Enemy 7: Big Fang |
 |
| Card 1 effect |
| Heals 25% of user’s maximum HP |
| Card 2 effect |
| Heal user by 50% of the damage to the target |
| Card 3 effect |
| nothing special |
Experience earned / SLP
| Ruin | Aim level | Experience points | SLP |
| 9 | 8 | 362 | 2SLP |
Ruin10 (aim level 10)


This is the last Ruin explained in this article.
If the level of Axie reaches 10, I think it will be relatively easy to clear.
In Ruin10, many enemies use stun debuff, so even if you put up a shield, damage can penetrate your shield.
In Wave3, Little Rock comes out again.
[chat face=”TJ_normal.png” name=”TJ” align=”left” border=”gray” bg=”none” style=”maru”]Little Rock didn’t come out in Ruin9, so I have the impression that it’s been a while, but that’s not the case (lol).[/chat]
You’ll be using a lot of cards in Round 1, so try to use as many cards as you can to withstand the attack.
Enemy information
| Enemy 1: Toady |
 |
| Card 1 effect |
| Apply Stun Debuff to target (* Stun = Axie with this debuff will always fail the next attack. Attack, disappear when attacked. Attacked through the shield. ) |
| Card 2 effect |
| Apply a stun debuff to the target with a 30% chance. (* Stun = Axie with this debuff will always fail the next attack. Disappear when attack or attacked and damage will break through the shield. ) |
| Enemy 2: Toady |
 |
| Card 1 effect |
| Apply a stun debuff to the target with a 30% chance (* Stun = Axie with this debuff will always fail the next attack. Disappear when attack or attacked and damage will break through the shield. ) |
| Card 2 effect |
| nothing special |
| Card 3 effect |
| Apply Speed- Debuff to target for 2 rounds (Speed- = 20% Speed decrease in the next round) |
| Enemy 3: Big Fang |
 |
| Card 1 effect |
| Heals 25% of user’s maximum HP |
| Card 2 effect |
| Heal user by 50% of the damage to the target |
| Card 3 effect |
| nothing special |
| Card 4 effect |
| nothing special |
| Enemy 4: Toady |
 |
| Card 1 effect |
| Apply Stun Debuff to target (* Stun = Axie with this debuff will always fail the next attack. Attack, disappear when attacked. Attacked through the shield. ) |
| Card 2 effect |
| Apply a stun debuff to the target with a 30% chance (* Stun = Axie with this debuff will always fail the next attack. Disappear when attack or attacked and damage will break through the shield. ) |
| Card 3 effect |
| nothing special |
| Enemy 5: Little Rock |
 |
| Card 1 effect |
| nothing special |
| Card 2 effect |
| nothing special |
| Card 3 effect |
| nothing special |
| Enemy 6: Planter |
 |
| Card 1 effect |
| Apply Stun Debuff to target (* Stun = Axie with this debuff will always fail the next attack. Attack, disappear when attacked. Attacked through the shield. ) |
| Card 2 effect |
| Heal adjacent allies by 25% of it’s maximum HP |
| Card 3 effect |
| Apply a stun debuff to the target with a 30% chance (* Stun = Axie with this debuff will always fail the next attack. Disappear when attack or attacked and damage will break through the shield. ) |
| Enemy 7: Red Jam |
 |
| Card 1 effect |
| The user takes 20% of his maximum HP when used |
| Card 2 effect |
| Gives random damage to the opponent |
Experience earned / SLP
| Ruin | Aim level | Experience points | SLP |
| 10 | 10 | 383 | 4SLP |
Summary
In this article, I introduced the strategy and information of Ruin 6-10.
[chat face=”TJ_normal.png” name=”TJ” align=”left” border=”gray” bg=”none” style=”maru”]You might be surprised at the strength of Ruin 6 and Little Rock of Ruin 7.[/chat]
The SLP and experience points earned when clearing Ruin 6 to 10 are as follows.
| Ruin | Aim level | Experience point | SLP |
| 6 | 6 | 256 | 2SLP |
| 7 | 6 | 329 | |
| 8 | 7 | 305 | |
| 9 | 8 | 362 | |
| 10 | 10 | 383 | 4SLP |
・The maximum SLP that can be obtained by clearing ADVENTURE is 50 SLP per day.
・Experience points are not available without consuming Energy (20 by default).
・The amount of experience you can earn depends on the level of your Axie.
[chat face=”TJ_normal.png” name=”TJ” align=”left” border=”gray” bg=”none” style=”maru”]We have also created information after Ruin11, so please take a look![/chat]