- OpenSeaの登録方法
- OpenSeaでNFTを購入するまでのステップ
- OpenSeaの2種類のNFT購入方法
- オークション購入に必要な『WETH』の入手方法
この記事では、世界最大のNFTマーケットプレイスである『OpenSea (オープンシー)』の登録方法とNFTの購入方法を解説します。
最近では、ブロックチェーンゲームに使用されるNFTもOpenSeaを使って販売されることがあります。
 TJ
TJこの機会にOpenSeaでNFTを購入する方法を覚えて、スムーズにゲームをプレイできるようになりましょう!
OpenSeaの登録方法
TJまず初めに、OpenSeaの登録方法について説明します!
OpenSeaの登録方法は以下の2ステップです。
①メタマスクのウォレットを用意する
②メタマスクとOpenseaを接続する
※メタマスク以外のウォレットでも登録することができます。
TJでは、さっそくOpenSeaの登録方法を説明していきます!
メタマスクを用意する
TJOpenSeaの登録をするには、まずウォレットと呼ばれるデジタル上の財布を用意する必要があります。
本記事では、世界中で最も利用されているMetamask(メタマスク)を利用します。
メタマスクは必ず公式ページ(App Store/Google Play)からダウンロードしてください(Google chromeのブラウザである必要があります)
 TJ
TJ詐欺アプリが出回っているので注意!
安全なのはパソコンのブラウザ上にダウンロードする方法です!
メタマスクの具体的な登録方法については以下の記事を参考にしてください!
 TJ
TJ既にメタマスクに登録している方は、次のステップに進みましょう!
メタマスクとOpenseaを接続する
メタマスクの登録が完了したら、OpenSeaと接続をします。
TJイメージとしては、買い物をする「楽天市場」と、ユーザーの口座から直接引き落とされる「デビットカード」をつなげるイメージです!
ここからは、OpenSeaとメタマスクの接続方法の具体的な手順を説明していきます。
◆ OpenSeaとメタマスクの接続手順 ◆
❶OpenSeaの公式ページに行く
❷アカウントをタップし「メタマスク」を選択
❸「Accept and sign」をタップ
❹「署名」をタップ
❺アカウントの「プロフィール」を編集
TJそれでは、OpenSeaをメタマスクに接続させていきましょう!
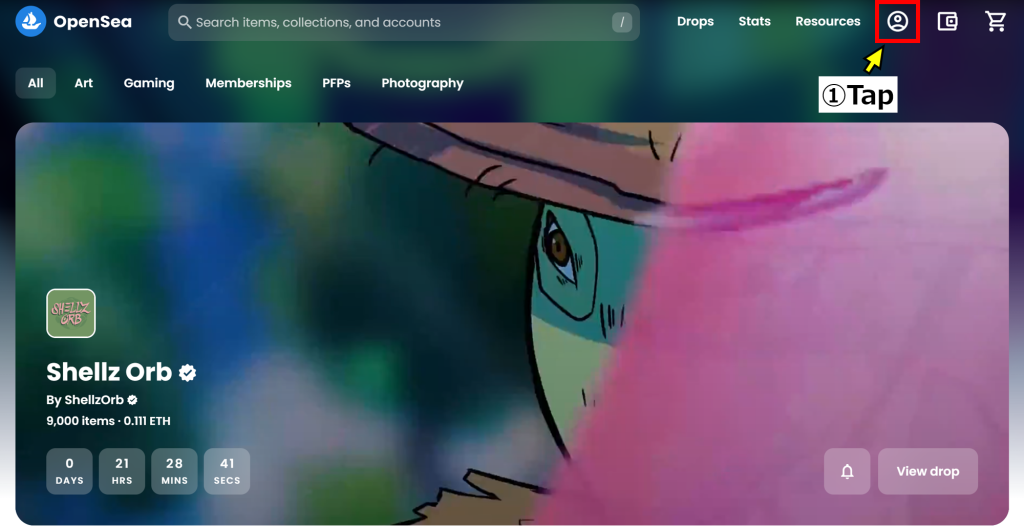
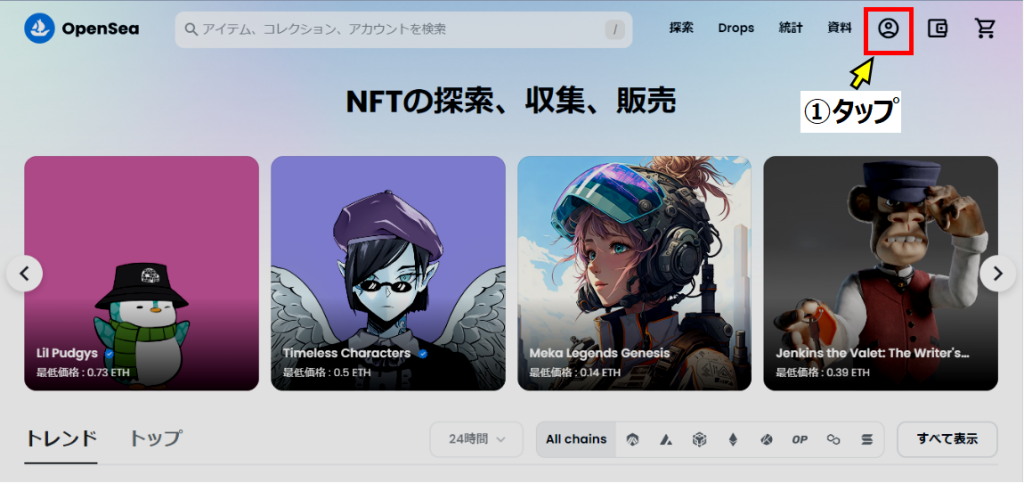
まずは、OpenSeaの公式ページに移動し、①のアカウントをタップします。
 TJ
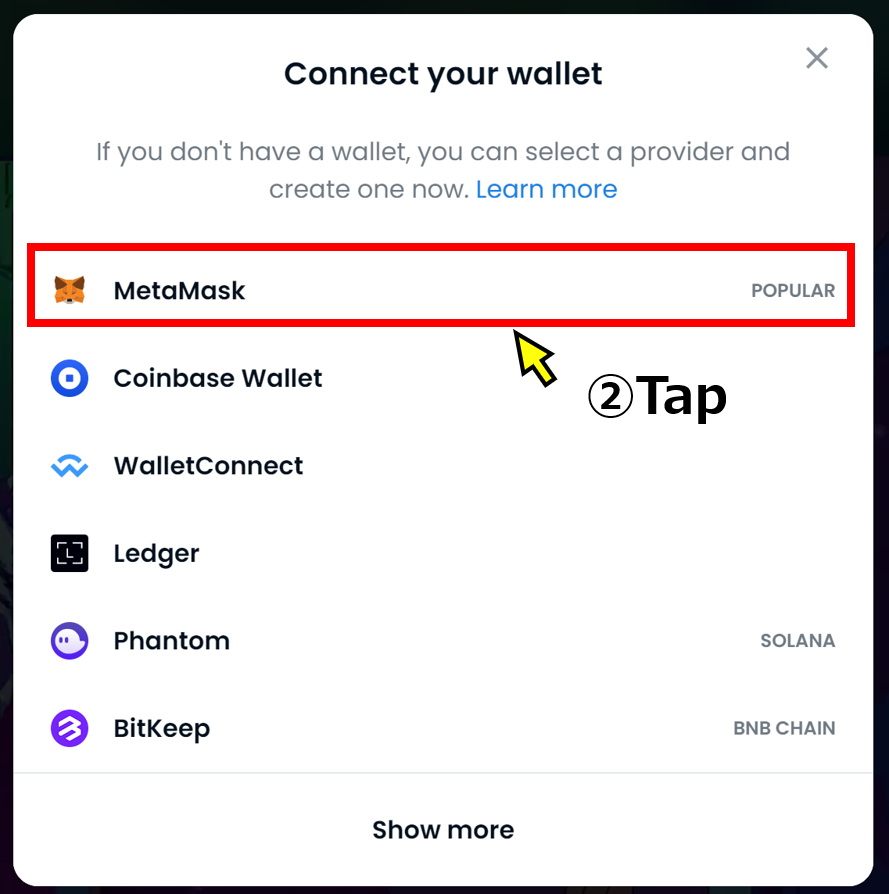
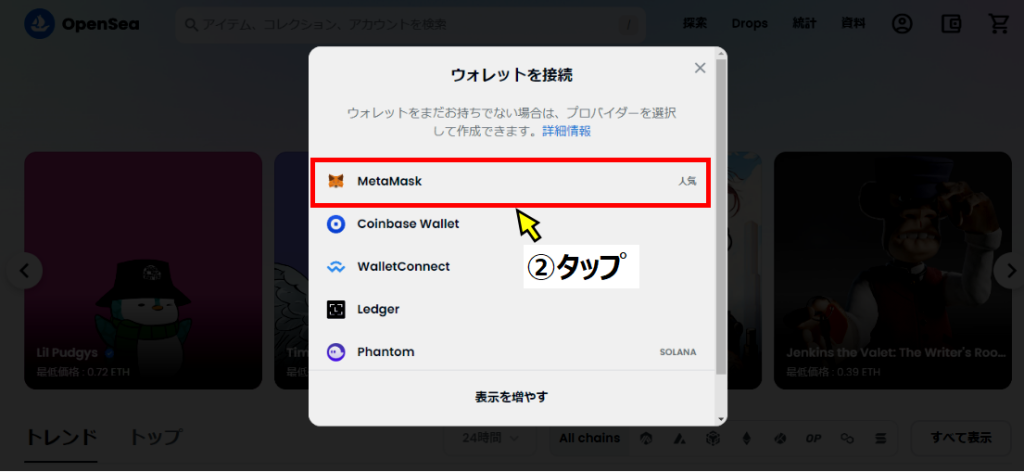
TJアカウントをタップすると、「ウォレットを接続」が表示されるので、「MetaMask」をタップします!
 TJ
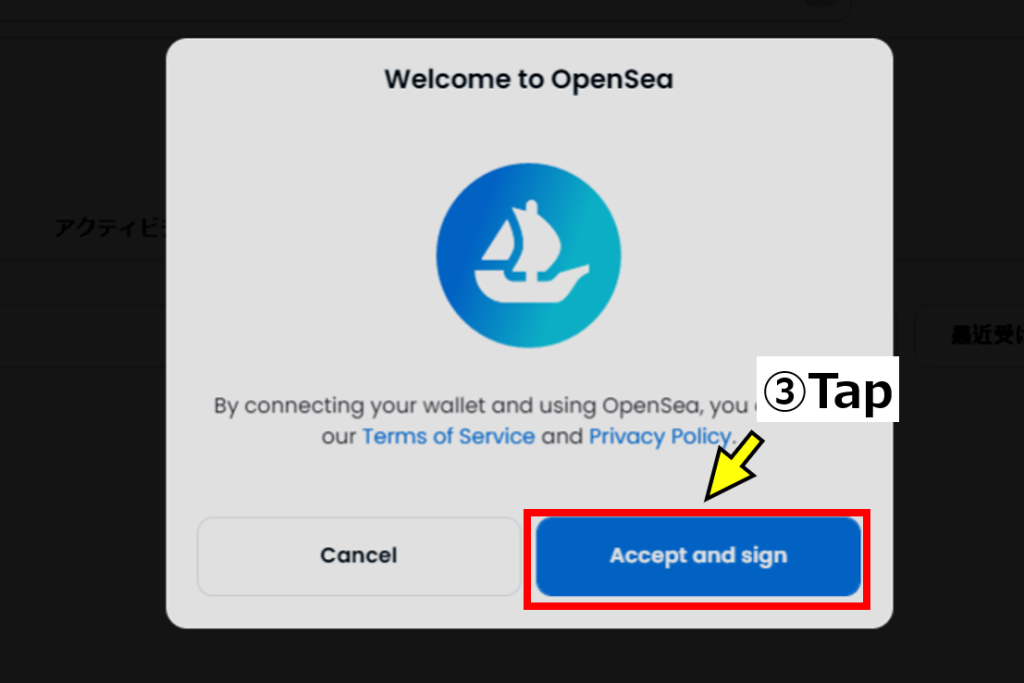
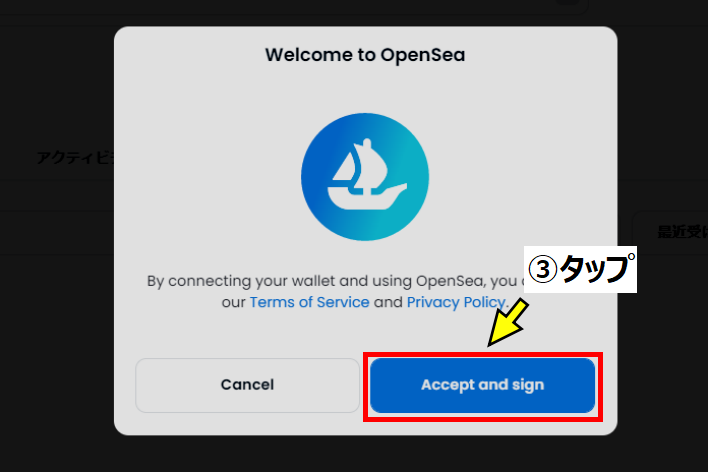
TJ「Welcome to OpenSea」と表示されたら、「Accept and sign」をタップします。
 TJ
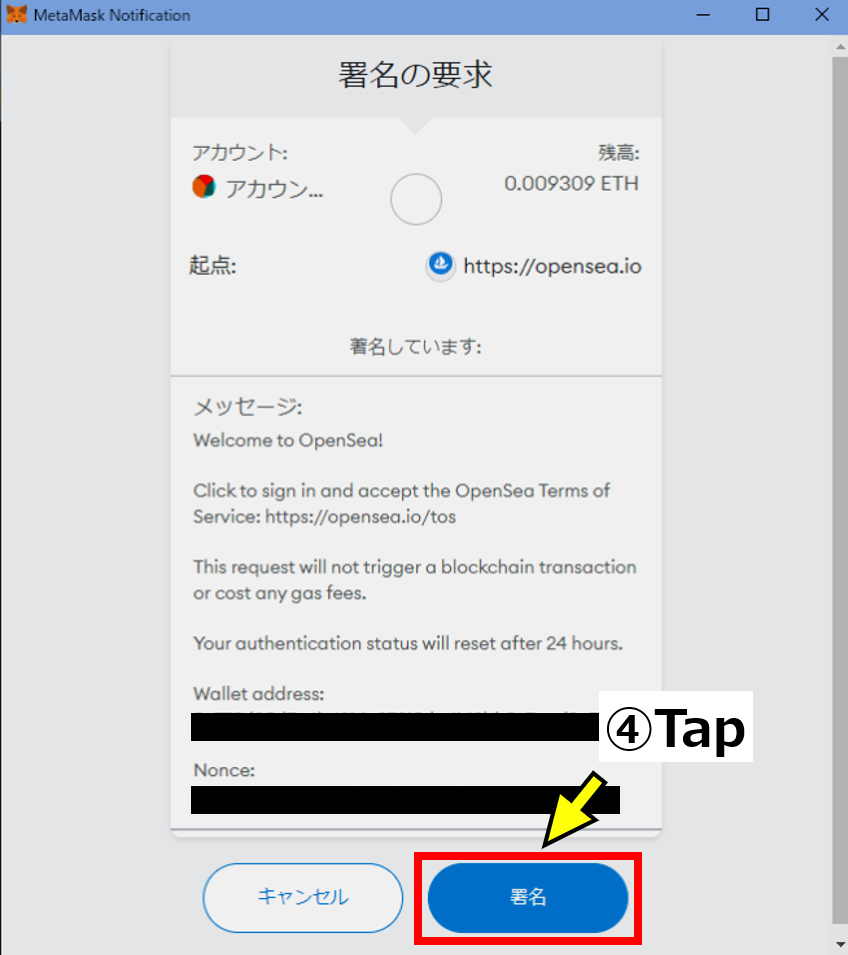
TJ続いて「署名の要求」が表示されるので、「署名」をタップしてください!
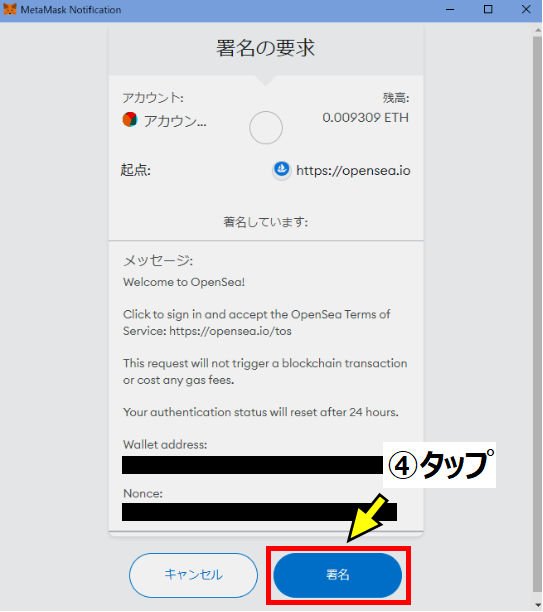
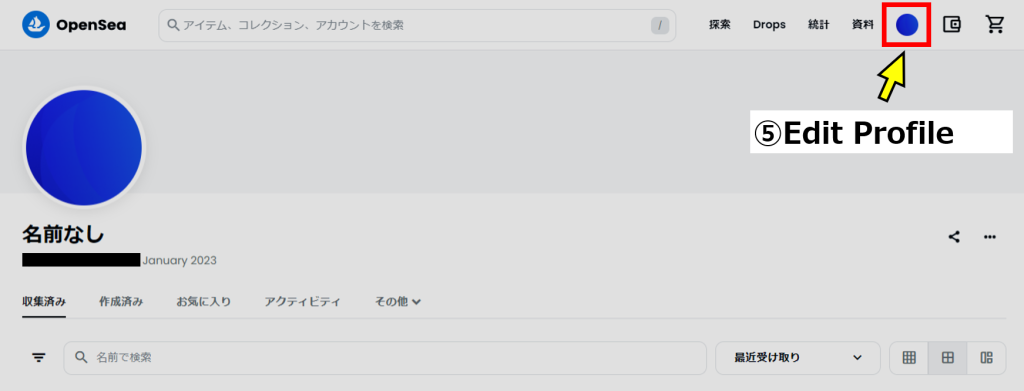
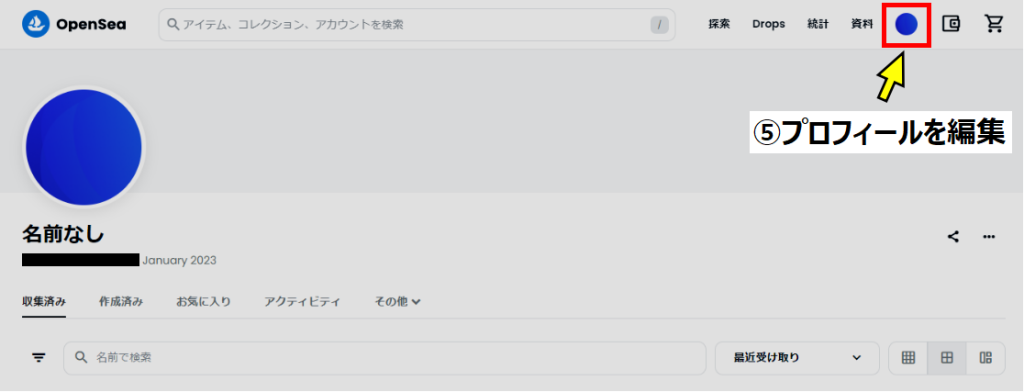
「署名」をタップすると、以下の画面になりOpenSeaとメタマスクが接続されます。
TJこのままでも使用できますが、余裕があればプロフィールも編集しておきましょう!
 TJ
TJここまで完了するとOpenSeaの登録は完了です!
OpenSeaでNFTを購入するまでのステップ
OpenSeaの登録とメタマスクの紐づけが完了したら、NFTを購入できるようになります。
しかし、NFTを購入するにはNFTの価格に合った暗号資産であるETH(イーサリアム)が必要です。
TJここからは、メタマスクにETHを送金しNFTを購入するまでを説明していきます!
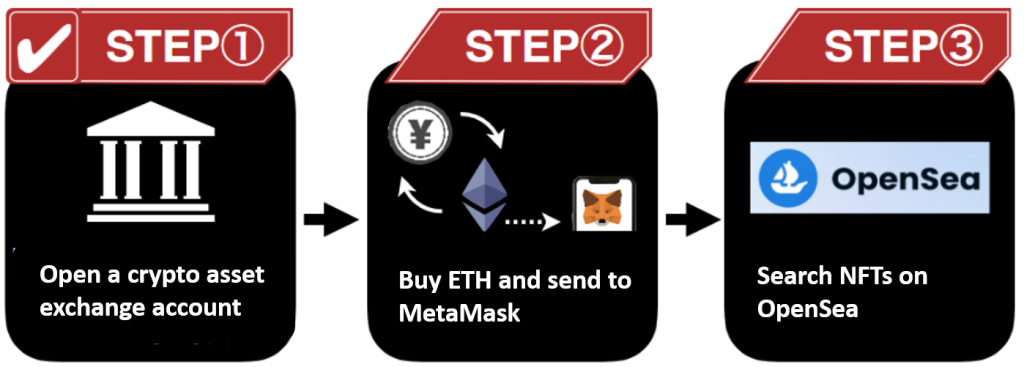
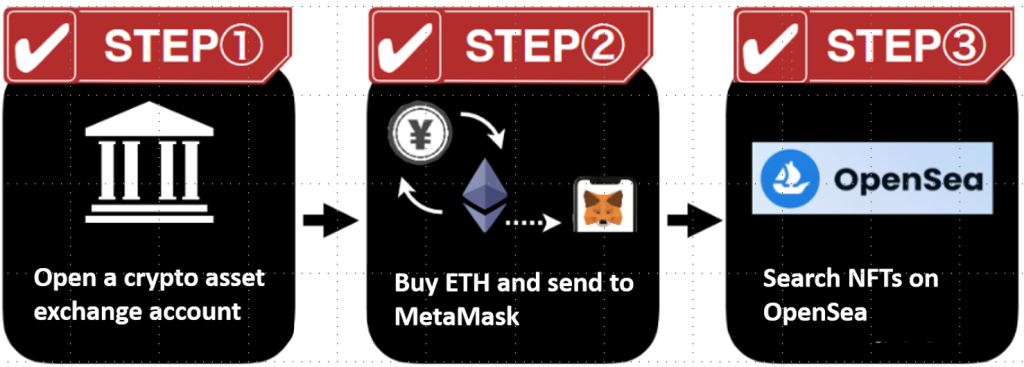
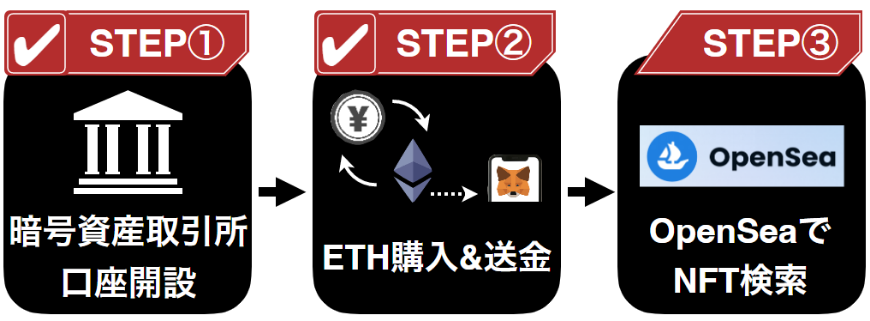
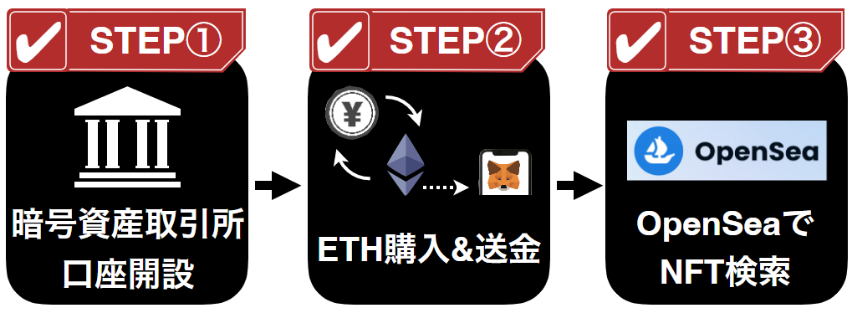
NFTを購入するまでの具体的なステップは以下の3ステップです。
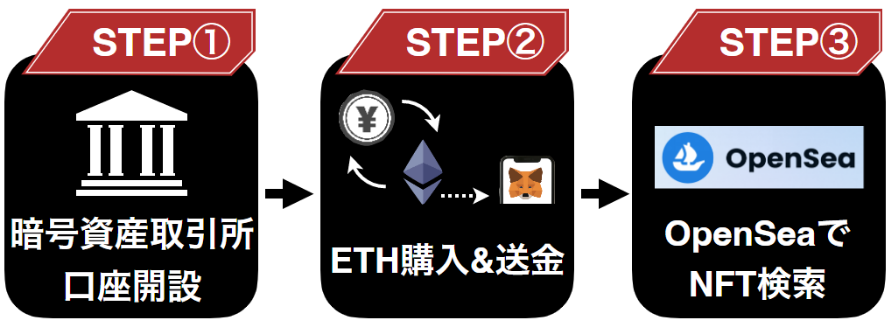 TJ
TJそれぞれのステップについて詳しく見ていきましょう!
STEP①暗号資産取引所口座開設
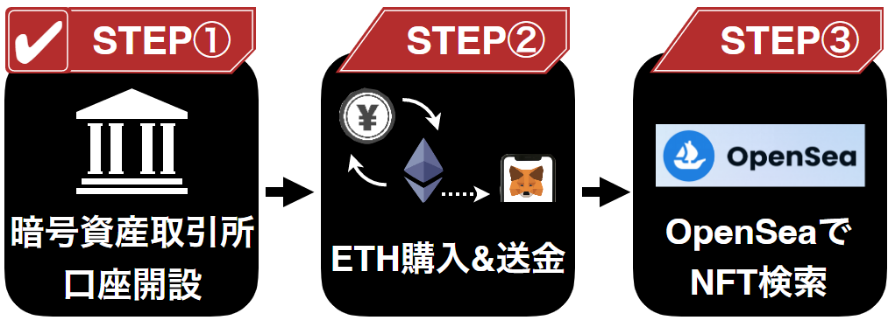
OpenseaでのNFTを購入するためには、暗号資産を持っている必要があります。
暗号資産は専用の取引所で買うため、まずは取引所の口座開設をしましょう。
国内/海外と取引所の種類は様々ありますが、安心かつ手数料の安い取引所ではDMMビットコインがおすすめです。
TJDMMビットコインの口座開設・登録方法は以下の記事を参考にしてください!
STEP②ETH購入&MetaMask送金
口座開設ができたら、イーサリアム(ETH)を購入しメタマスクに送金します。
TJ暗号資産の送金は、送付先のアドレスを間違えると暗号資産を失うことがあるので、十分注意しましょう!
暗号資産を送金したことがない方や、不安な方はぜひ下記の記事を参考にしてください!
 TJ
TJイーサリアムの買い方から送金まで一連の説明をしています!
DMM以外の暗号資産取引所からメタマスクへの送金する方も参考になりますよ!
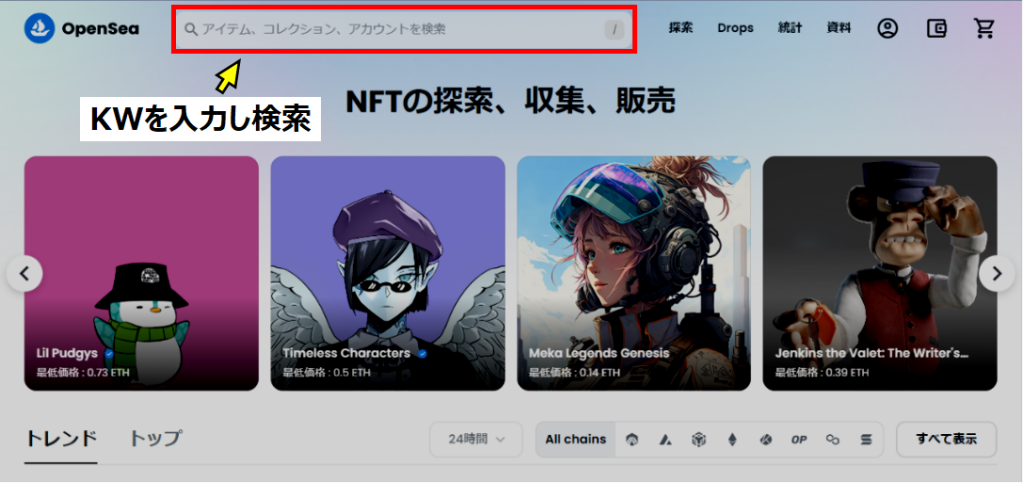
STEP③OpenSeaでNFT検索
暗号資産の送金が完了するといよいよNFTを購入することができるようになります。
TJ気になっている作品名や、プロジェクト名などのKW(キーワード)を入力して検索してみてください!
 TJ
TJ欲しいNFTは見つかりましたか?
次からは、実際にNFTを購入する方法を解説します!
OpenSeaの2種類のNFT購入方法
OpenSeaの登録が完了し、メタマスクに購入するときに十分金額があれば、いつでもNFTを購入することができます。
TJここからは、具体的なNFTの買い方について説明します!
NFTの購入は、大きく分けて2種類あります。
①通常購入(固定価格販売)
Lその場で購入
Lオファーして購入
②オークション購入
Lイングリッシュオークション
Lダッチオークション
TJこの方法はNFTを販売する出品者によってわかれます。
それでは、「通常購入」と「オークション購入」について詳しく説明します。
①通常購入
まず、通常購入をする方法について説明します。
通常購入は、提示されている価格で購入するのが基本的な買い方になりますが、購入するときにはNFTの価格と「ガス代」と呼ばれる手数料が必要になります。
TJNFTの価格より多めに資金をウォレットに入れておきましょう。
通常購入には2種類のやり方があると示しましたが、主なやり方は以下の通りです。
また、通常注文には「オファー注文」と言って、買い手が買いたい金額を提示することもできます。
❶その場で購入
・買いたいNFTをカートに追加
・「今すぐ購入」をタップ
❷オファーで購入
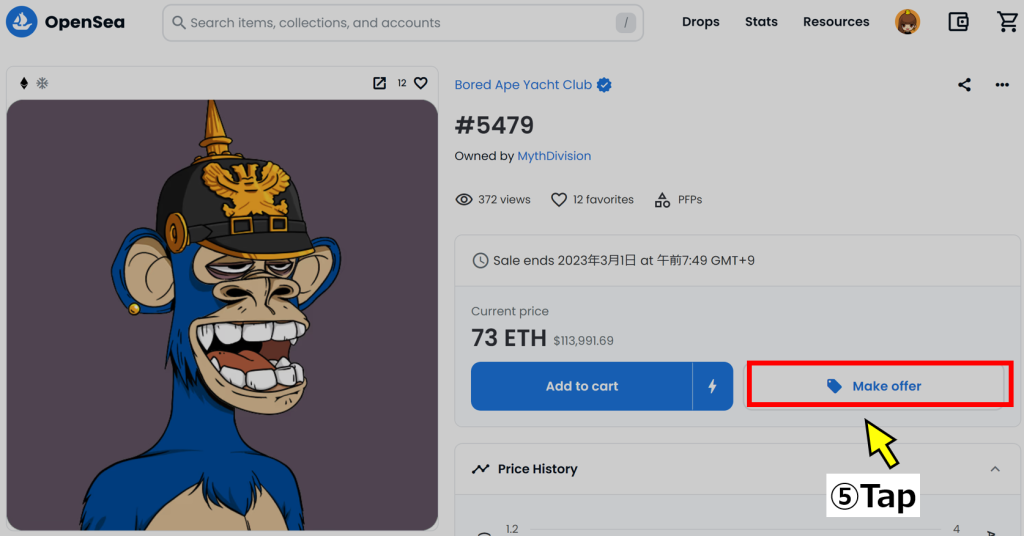
・買いたいNFTの画面で「オファーを提示」をタップ
・希望価格を記入
TJそれぞれ画像付きで説明していきますね!
※オファー注文やオークション購入では、通常のETHではなくWETH(ラップドイーサ)を使用します。
WETHの交換方法は後ほど解説します。
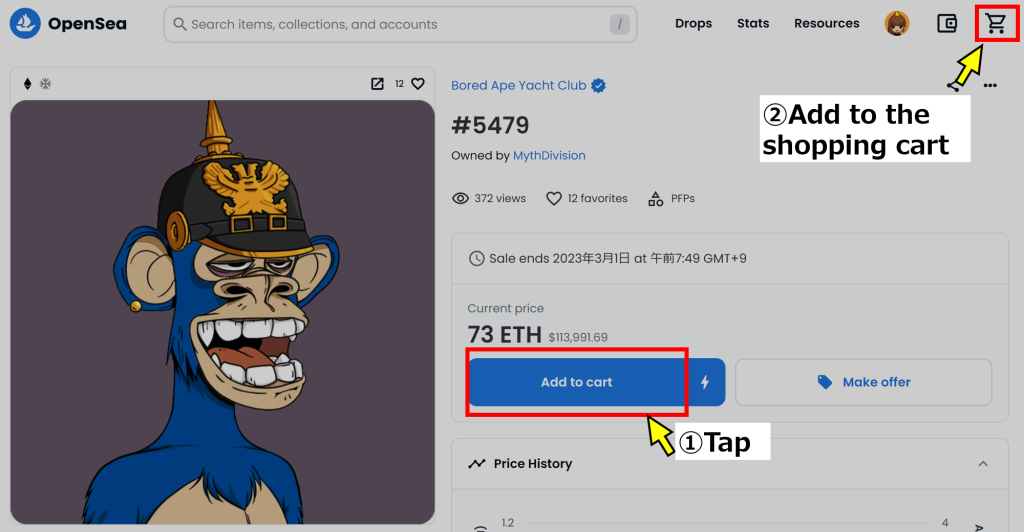
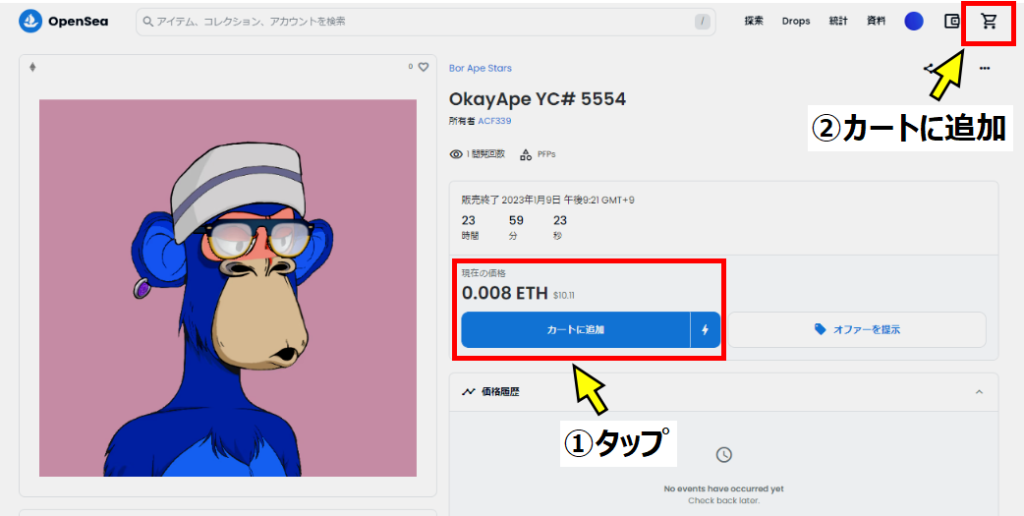
❶その場で購入する場合
TJその場で購入する方法はいたってシンプルです!
まず、買いたいNFTの「カートに追加」をタップし、右上のカートを確認します。
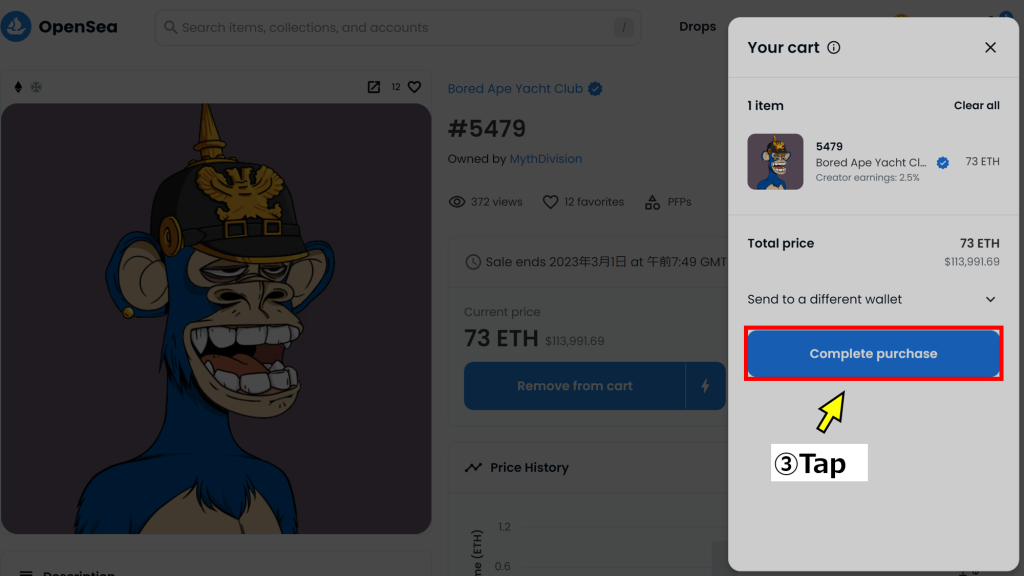
カートをタップすると、下写真のように表示されるので、欲しいNFTで間違いないか確認し「購入を完了」をタップしてください。
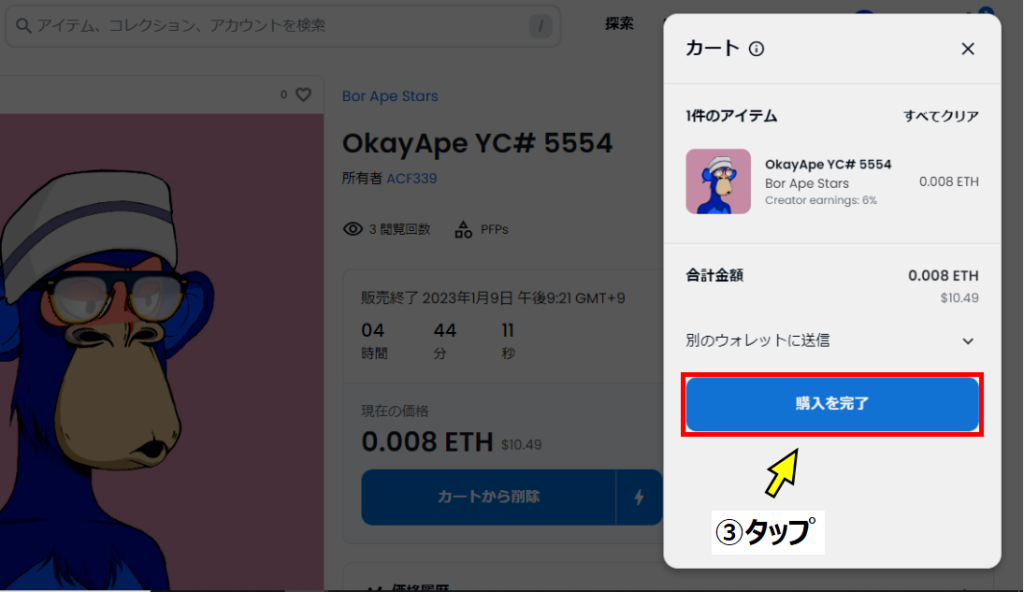 TJ
TJ「購入を完了」をタップすると、メタマスクに接続され、承認を求められます。
その時、手数料のガス代も確認し、間違いなければ「承認」、「署名」をタップして購入完了です。
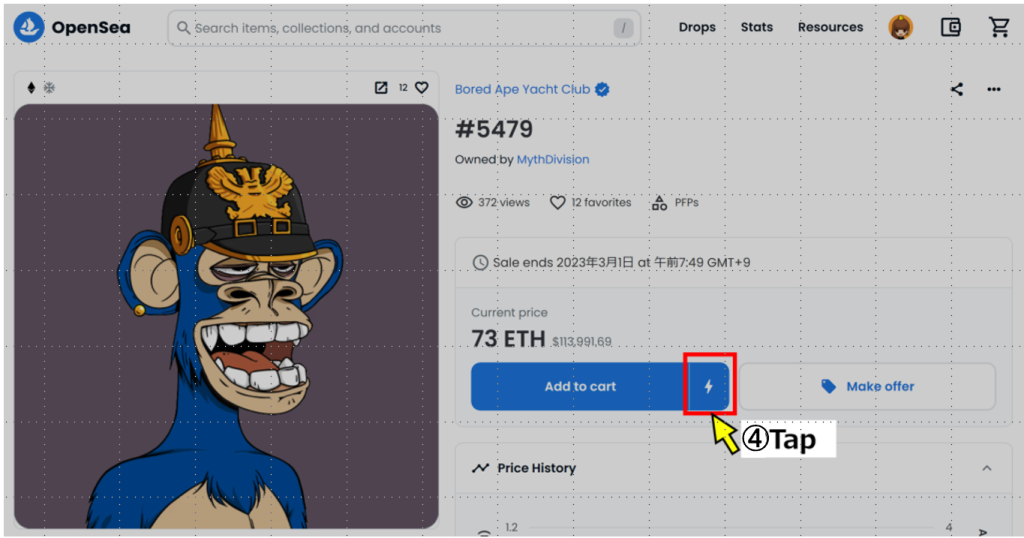
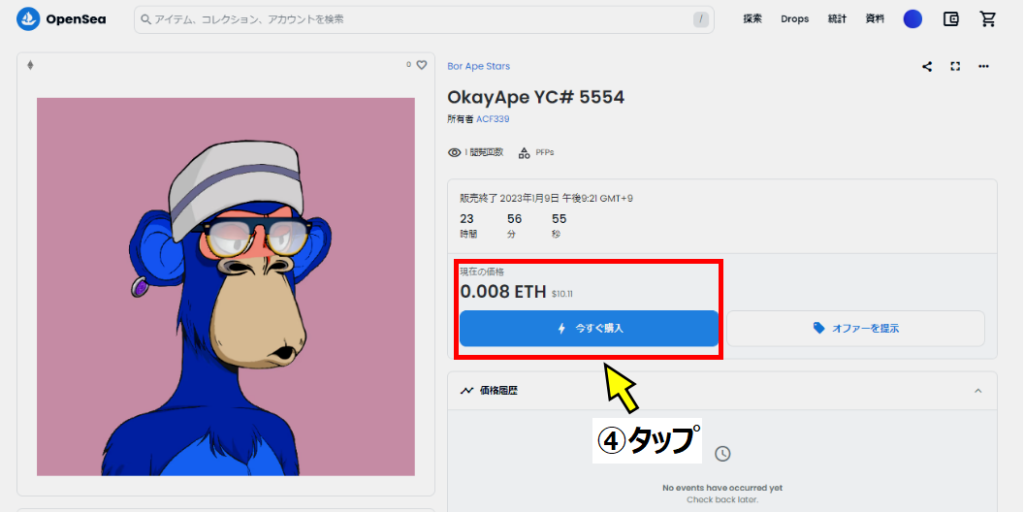
また、「カートに追加」の横にある「⚡」にカーソルを合わせることで、「今すぐ購入」することができます。
TJ「今すぐ購入」をタップすると、すぐにメタマスクに接続されるので、1つだけNFTを買いたい場合や、早く買いたいときはこちらの方が早く購入できます。
❷オファーで希望価格を提示する場合
TJ続いて、「オファーを提示」して購入する方法を説明します!
まず、「オファーを提示」をタップします。
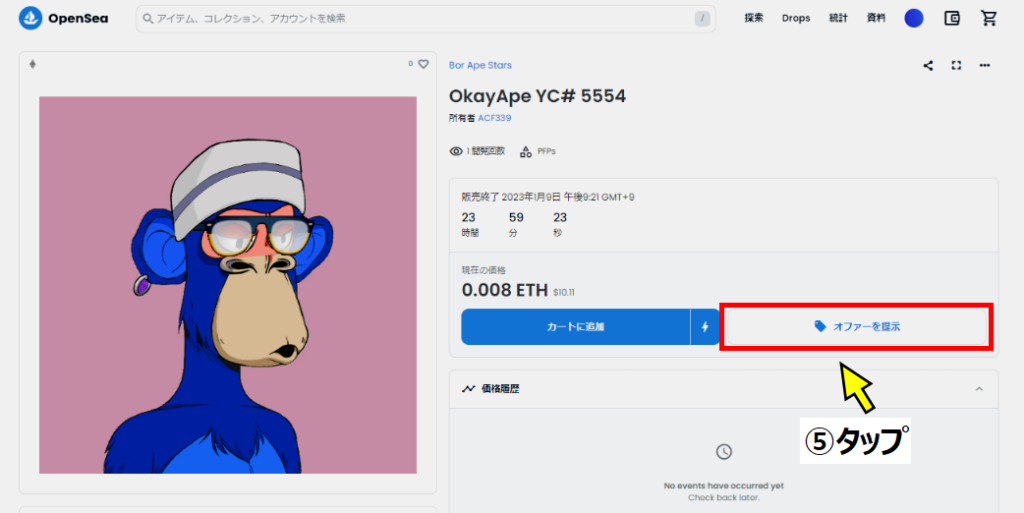
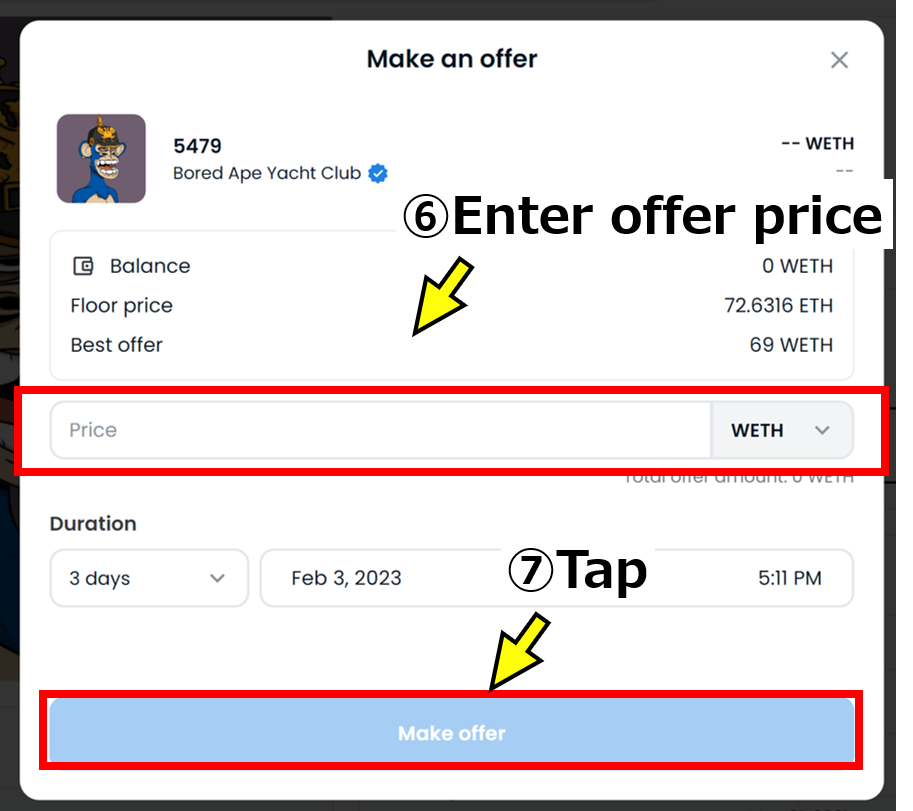
以下の画面が出てきたら希望金額(WETH)を入力して、「オファーを提示」をタップします。
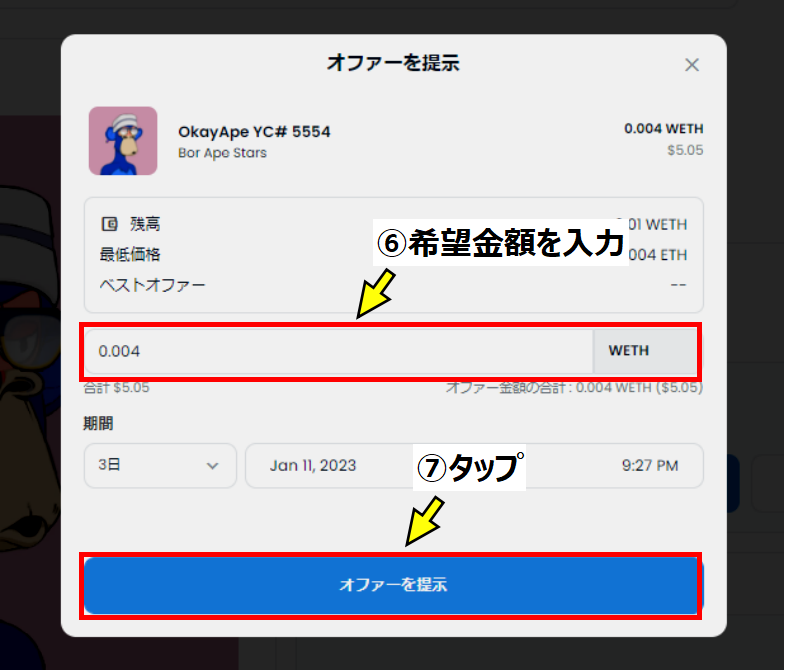
オファーを出した後、希望金額に対して相手が了承すれば取引成立となります。
TJここで注意して欲しいのは、購入はWETH(ラップドイーサ)になるので、事前にETHをWETHに変換しておきましょう。(変換方法は後程記載します)
以上が「通常購入」の説明です。
オークション購入
オークション購入は大きく分けて「イングリッシュオークション」と「ダッチオークション」があります。
◆ 「イングリッシュオークション」と「ダッチオークション」の違い ◆
【イングリッシュオークションとは】
最高額の入札者が購入する権利を得られる、価格が上がっていくオークション形式。
【ダッチオークションとは】
入札者が現れるまで価格が下がるオークション形式。
TJ特にイングリッシュオークション購入は採用されやすいので、この機会に覚えておきましょう!
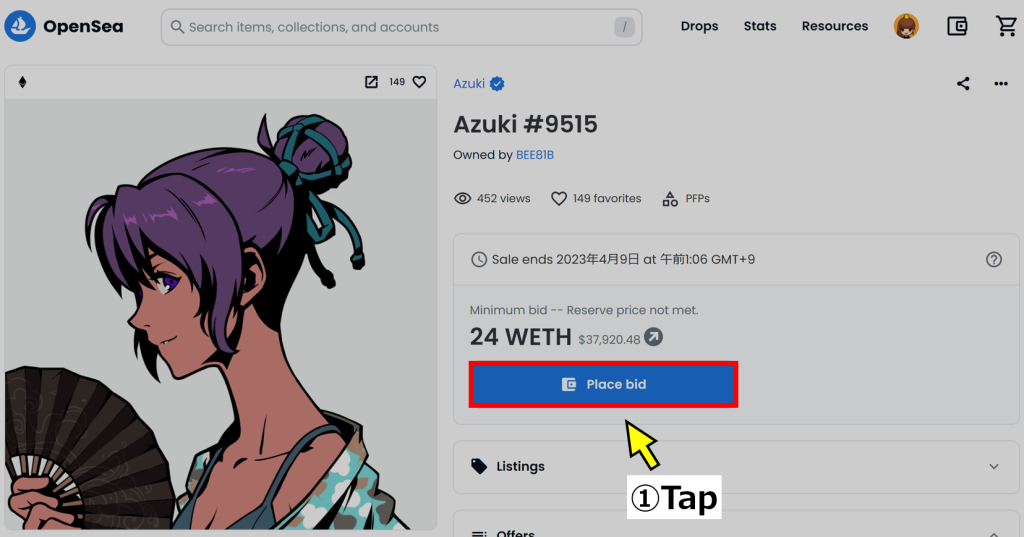
オークション購入では、入札期日までに最高額の注文を出した人が落札(購入)できる「イングリッシュオークション」について説明します。
オークション購入も操作自体は難しくないので安心してください。
TJスクエアエニックスが手掛ける『SYMBIOGENESIS』は、このイングリッシュオークションでNFTが取引されます!
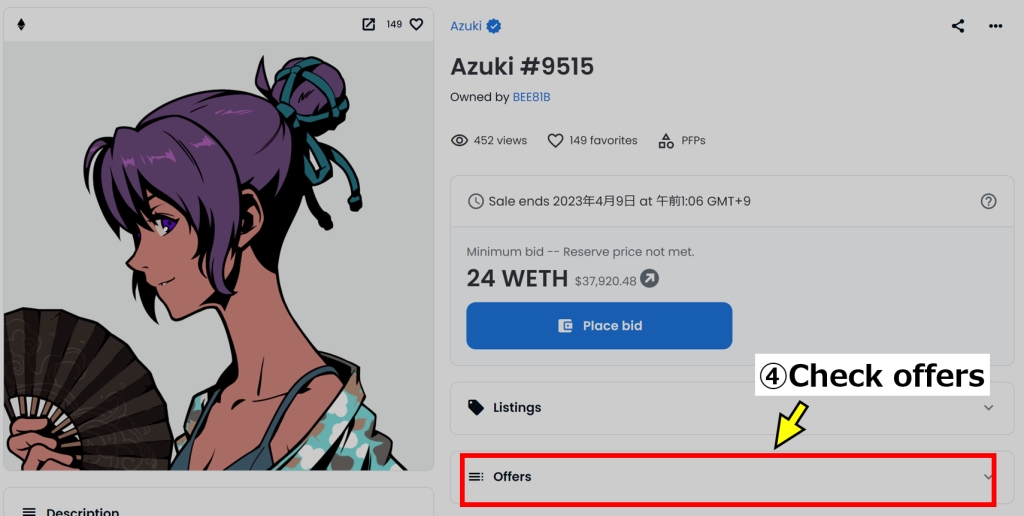
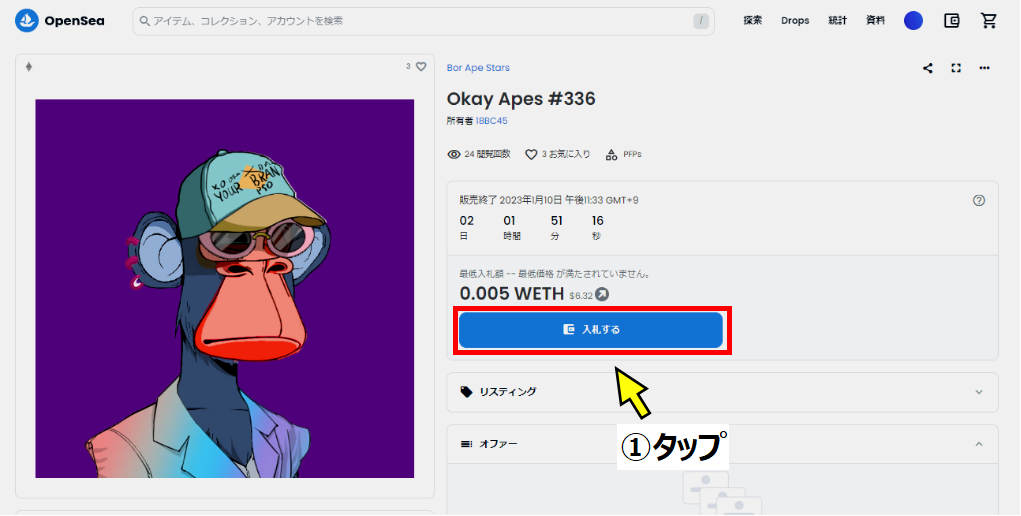
まず、下の画面で「入札する」をタップします。
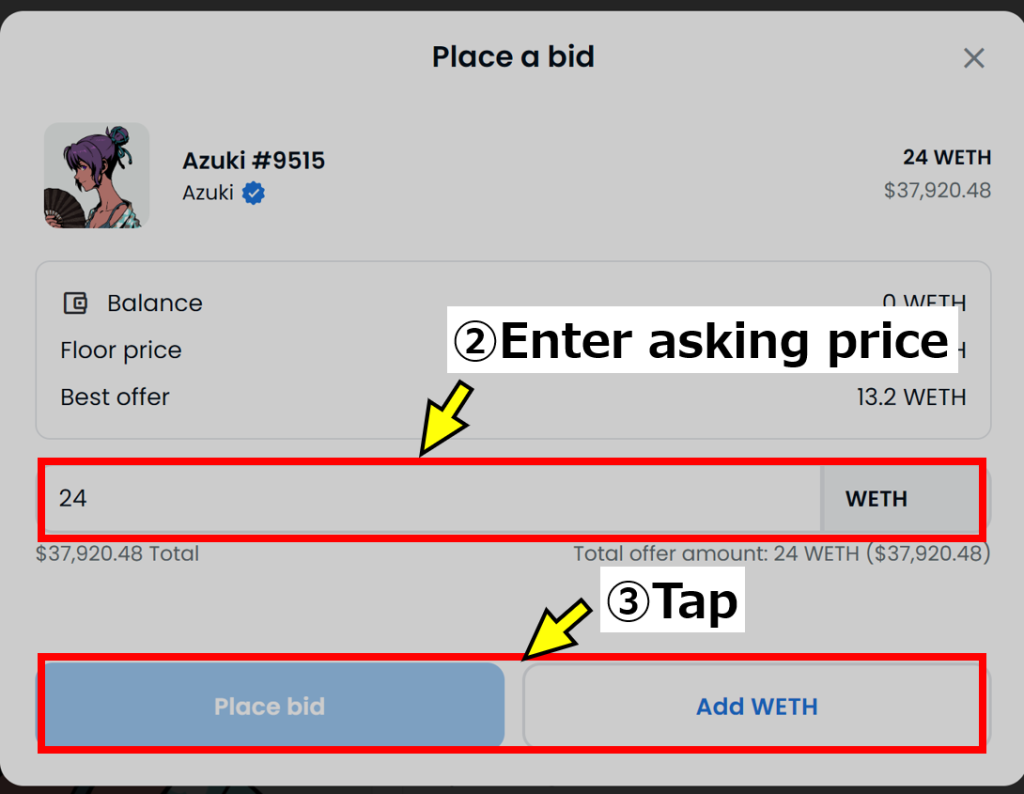
次に下の「入札」画面になったら、希望金額を入力して、「入札」をタップします。
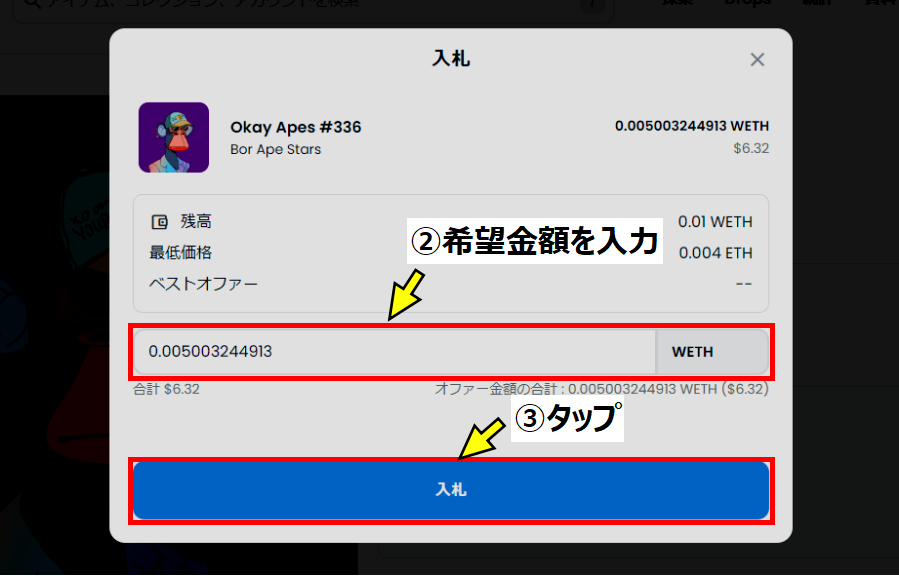 TJ
TJ「入札」をタップすると、メタマスクに接続され、承認を求められます。
間違いなければ「承認」、「署名」をタップしてオークションに参加完了です。
ちなみに、自分が参加できているかは下の画面で確認できます。
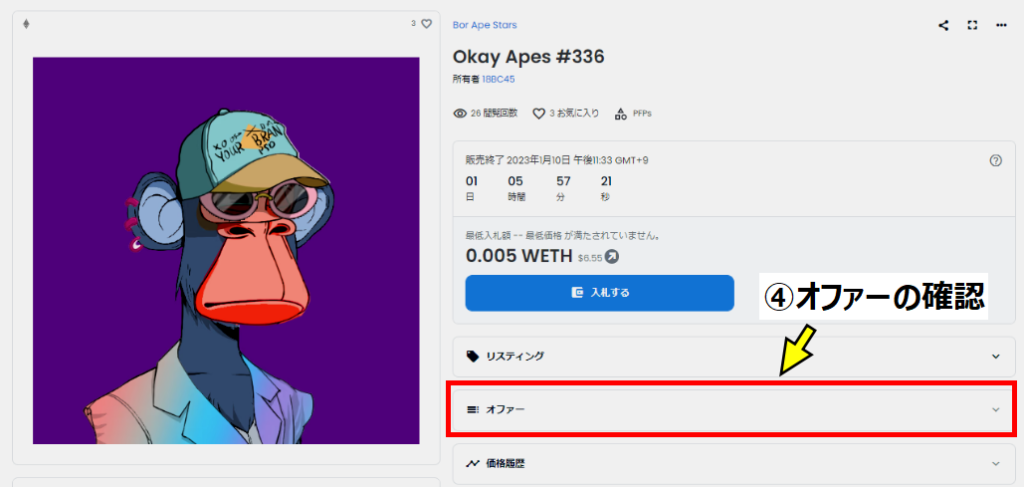 TJ
TJ「オファー」をタップすると入札者の情報が確認できるので、自分の入札額が反映されているか確認してください!
以上が「オークション購入」の流れです。
TJOpenSeaでNFTを購入する方法が分かれば、気になるNFTはもちろん、ブロックチェーンゲームにも参加しやすくなるので、ぜひマスターしてください!
イングリッシュオークションに必要な『WETH』の入手方法
最後に、OpenSeaのオークション入札に必要な「WETH」(ラップドイーサ/「赤イーサ」とも呼ばれる)に交換する手順を紹介します。
ここで注意して欲しいのが、「ガス代」といわれる手数料です。
WETHの交換レートは「1ETH=1WETH」ですが、このガス代によって余分にETHが必要になります。
TJWETHに交換するときは、交換したいETHより多くのETHを送金しておきましょう!
では実際に、「WETH」に交換する方法を紹介します。
WETHに交換する方法
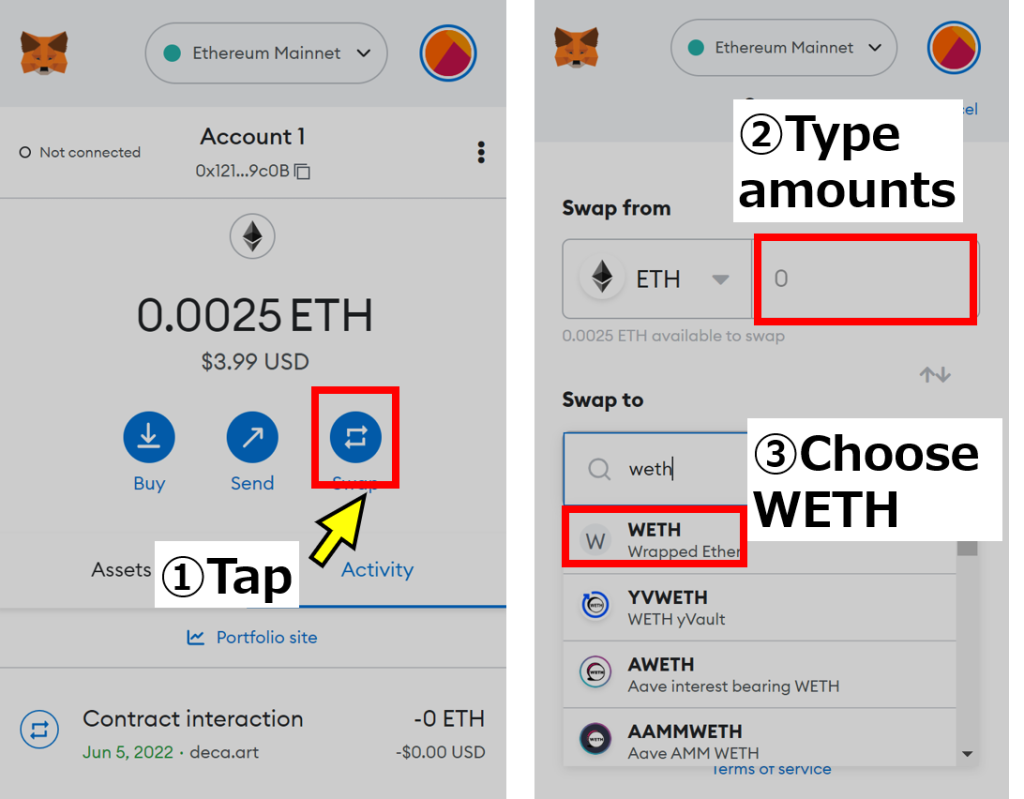
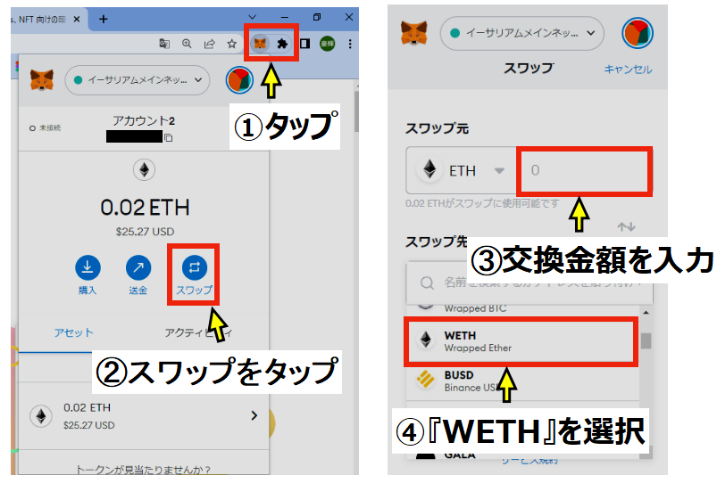
まず、メタマスクを開きウォレットにETHが入っていることを確認しましょう。
TJ下の画像の①~⑨を参考にしてください!
必要な分のETHが入っていることを確認したら、「スワップ」をタップし、交換する金額を入力、『WETH』をスワップ先として選択します。
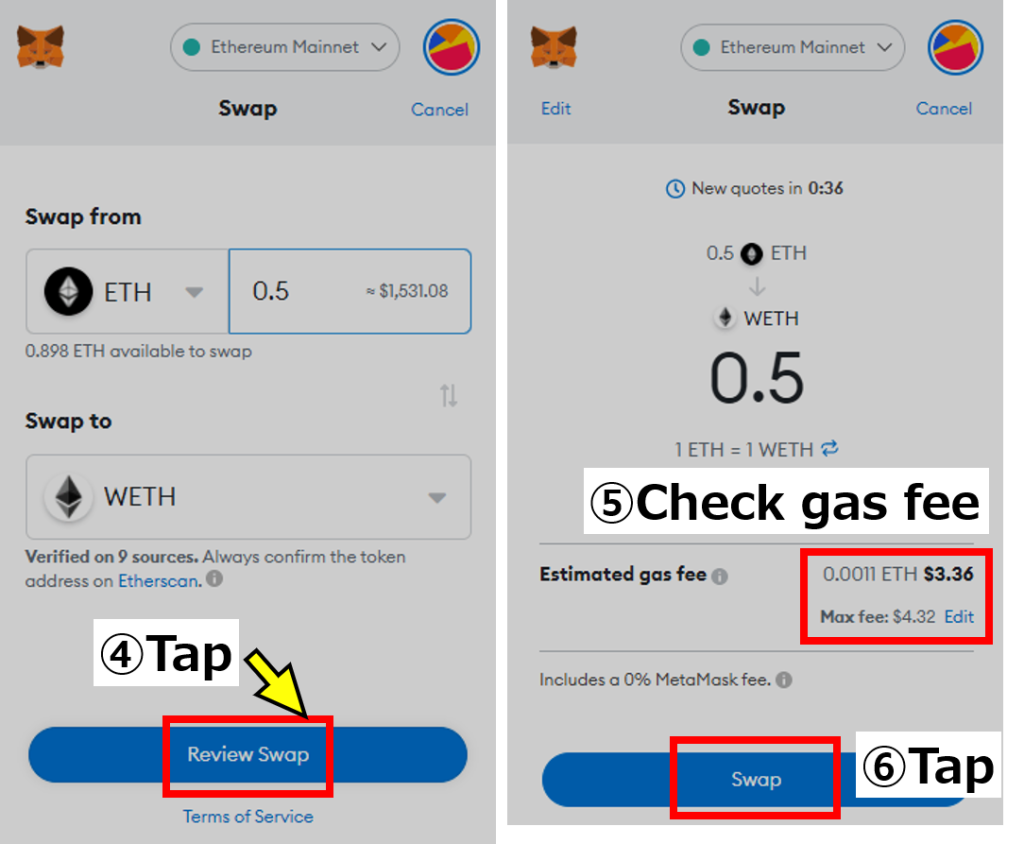
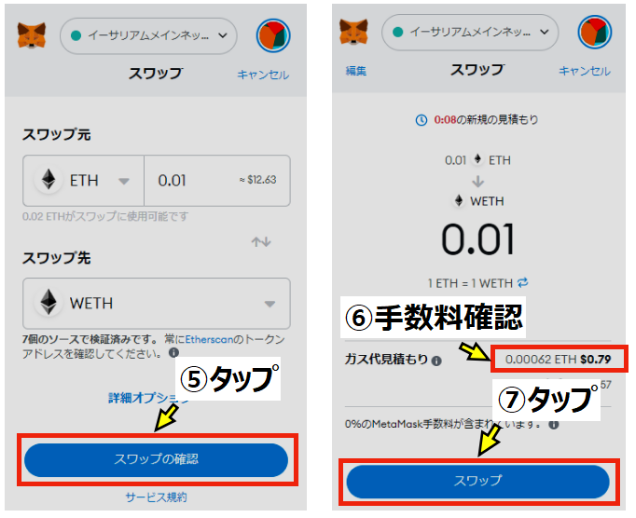
金額と『WETH』を入力できたら「スワップの確認」をタップし、手数料を確認後、「スワップ」をタップします。
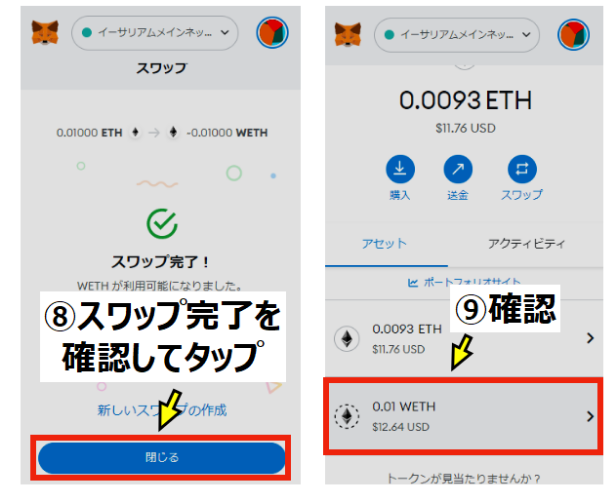
下左の画面が出てきたらスワップは完了しているので、ご自身のメタマスクに戻り、『WETH』が反映していることを確認してください。
 TJ
TJオークションやオファー注文をするときに、その場で『WETH』に交換する方法もありますが、慣れないうちは事前に準備しておくことをおすすめします!
Openseaの使用の際に注意したいこと
お目当てのNFTは発見&購入できましたでしょうか。
最後にOpenseaでNFTを購入する際に気を付けておきたいことをまとめます。
ETHのガス代に注意!!
イーサリアム(ETH)は手数料(ガス代)が高いことで有名です。
TJメタマスクへの送金、Openseaでの購入など、取引の際に毎度手数料がかかります。
ガス代は一定ではなく、そのときのETHの取引量によって変わるので、残高が足りない!ということがないよう逐一チェックする必要があります。
 TJ
TJETHのネットワーク回線が混んでいるほど遅いし、費用が高くなります
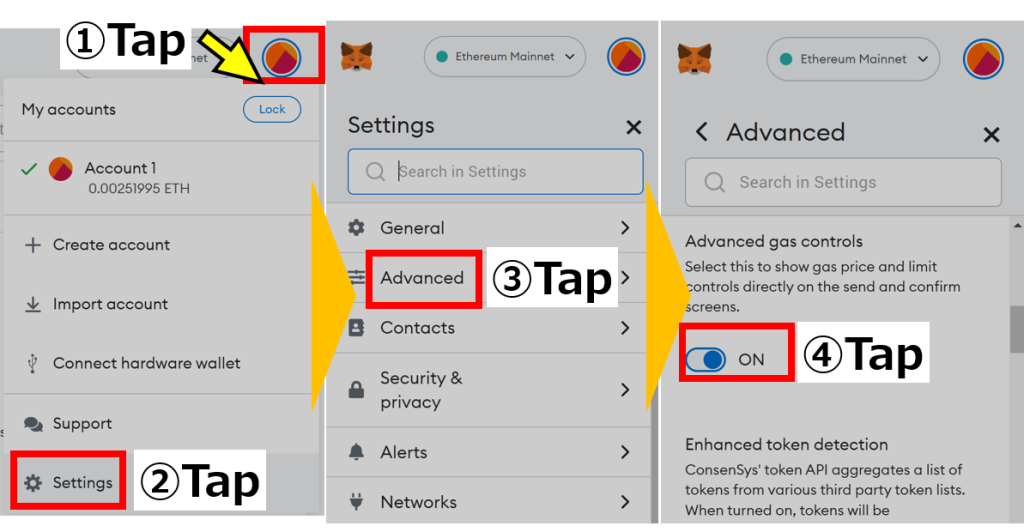
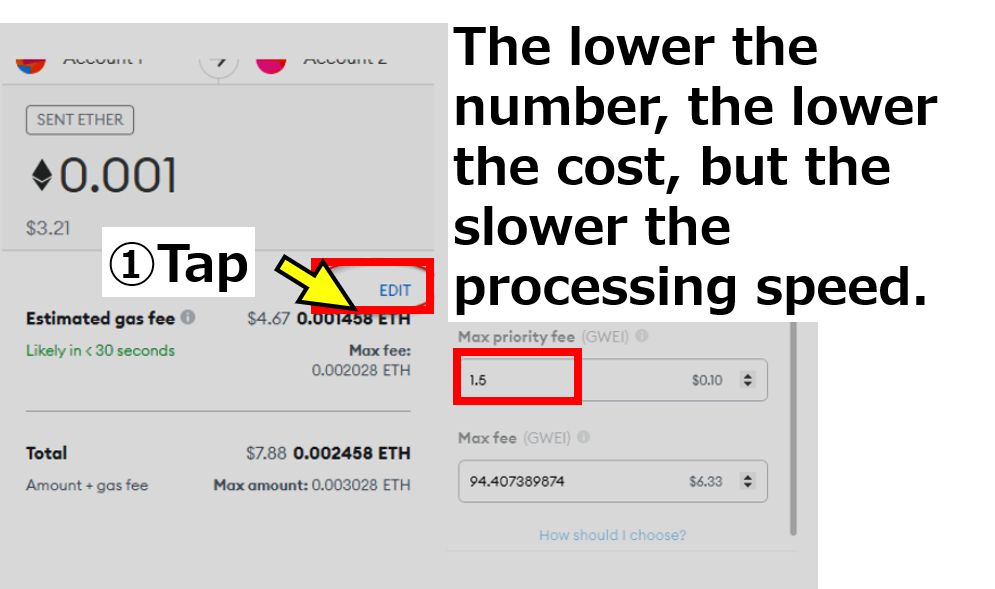
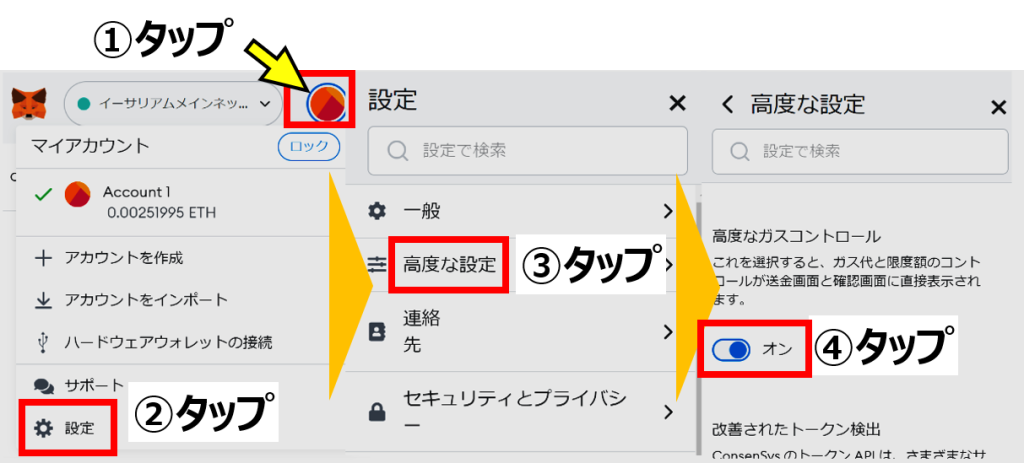
もしガス代を自分で調整したい場合はメタマスクで「高度な設定」をオンにします。
実際にNFTを購入する際に、メタマスクがポップアップして手数料確認をしてくるので、その際に「編集(EDIT)」ボタンを押します。
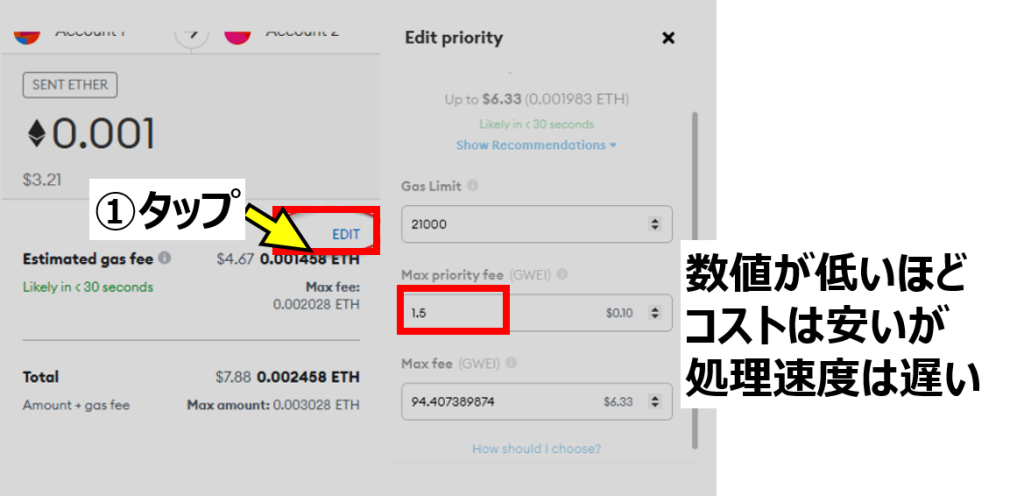
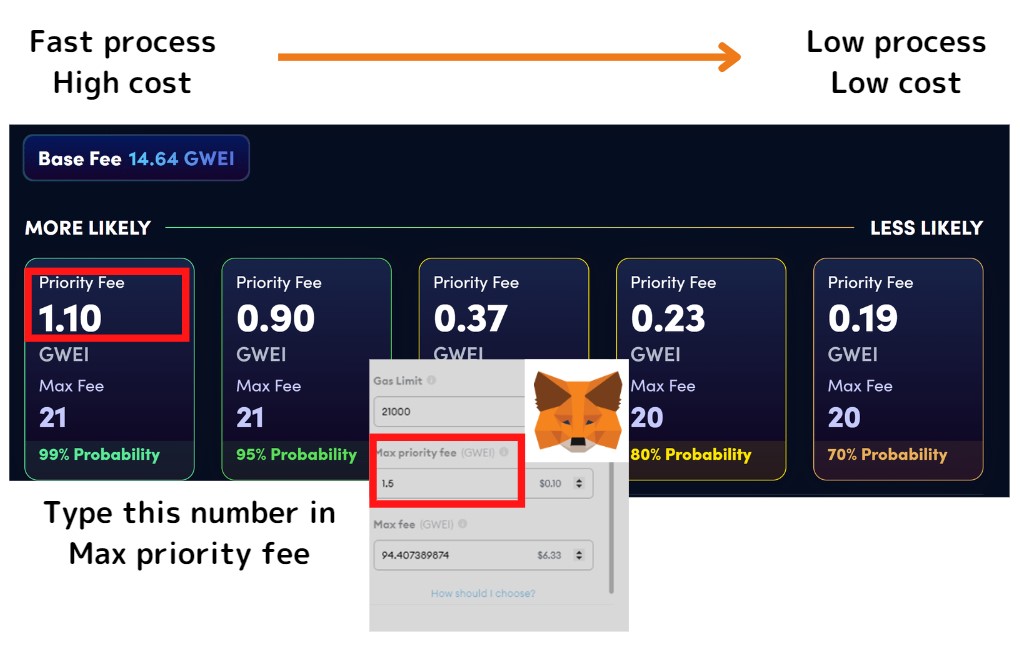
Max priority feeを主に変更します。(Max feeはMax priorityを変更すると自動換算されます)
ETHのガス代の目安を知るためにガス代チェッカーを使って、記入していきましょう。
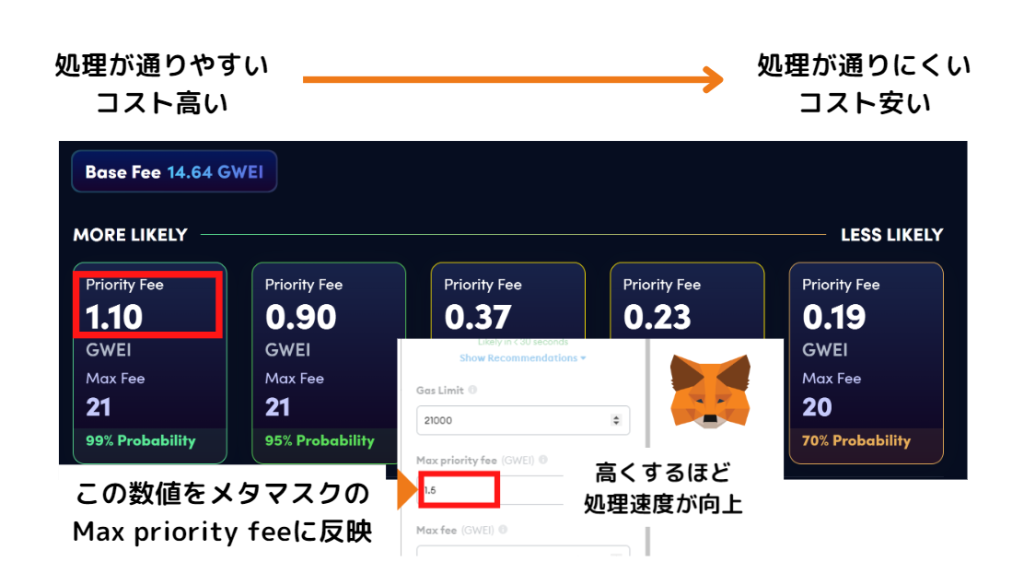 TJ
TJもしガス代を高すぎに設定しても不必要だった部分は返金されるので気にしすぎなくてもいいかも。
逆にガス代を低く設定しすぎると取引が遅れて失敗しやすくなるほか、ガス代だけかかり無駄なコストになってしまう場合もあるのでガス代調整は慣れてから行うことをおすすめします。
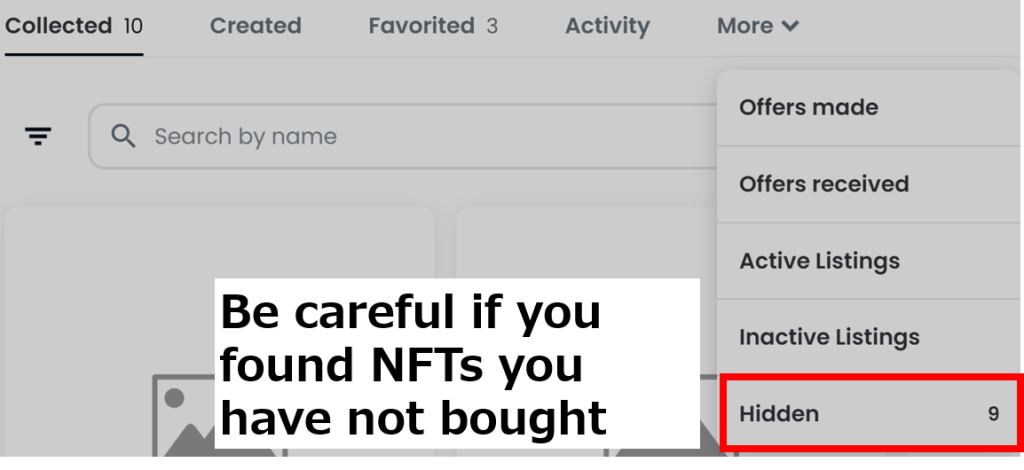
見知らぬNFTに注意!
Openseaに登録すると、自分が購入したコレクションを見ることができます。
プロフィールのページにアクセスすることで、実際に持っているNFTを確認できるのですが…
TJ購入覚えのないNFTが届いていたりします…基本触らないで!
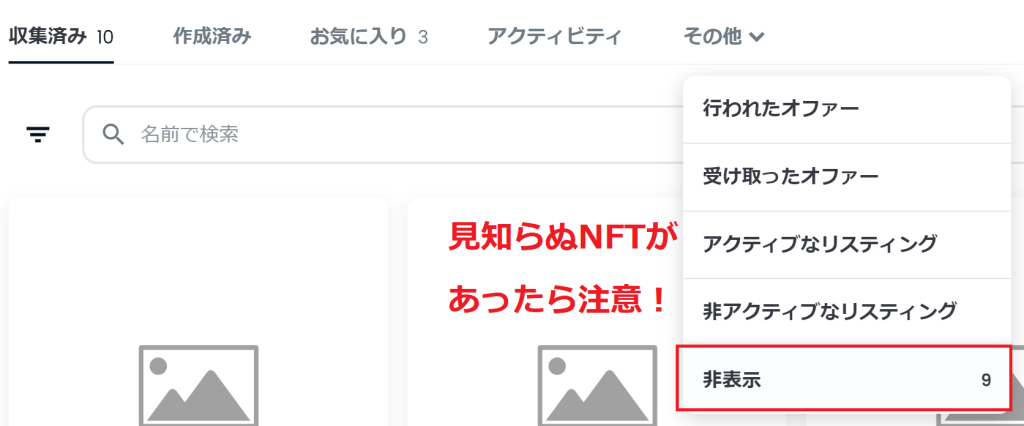
特に「非表示」に入っているNFTについては「表示」の設定をすると他のNFTも盗られてしまう可能性があるので注意が必要です。
OpenSeaの登録方法とNFT購入方法 まとめ
この記事では、OpenSeaの登録の仕方からNFTの購入方法までを解説してきました。
①メタマスクのウォレットを用意する
②メタマスクとOpenseaを接続する
※メタマスク以外のウォレットでも登録することができます。
TJOpenseaの登録をする前にまずウォレットの準備をすることが要です!
NFTの購入方法では「通常購入」と「オークション購入」の2種類があることをお伝えしました。
①通常購入(固定価格販売)
Lその場で購入
Lオファーして購入
②オークション購入
Lイングリッシュオークション
Lダッチオークション
TJオークション購入はETHをWETHに変える必要があるのでひと手間かかりますね
メタマスクやOpenSeaは繰り返し使用することで操作に慣れます。
この記事を参考に、OpenSeaで購入する方法をぜひマスターしてください。